Chasing and repoussé has been used by jewellers from as early as the ancient civilisations in the Bronze Age, and even before. The technique picked up speed all around the world, being used in Ancient Egypt, Greece, India and Pre-Columbian America – and is still a skill sought after by many jewellers today. Although, getting the hang of chasing and repoussé can be challenging at first, it’s super rewarding once you’ve mastered it.
Find out more about the chasing and repoussé tools and techniques and what it actually is, below.
What is repoussé jewellery?
If you’re completely new to this technique, you might be wondering; “what is repoussé jewellery?”. Let’s start by decoding its name.
Chasing, originates from the French word ‘chasser’ meaning, ‘to chase’ as the technique involves pushing back the metal to make the design protrude forward.
In a similar vein, repoussé is another French word meaning ‘push up’, referring to the action of hammering behind the design to bring it forward at the front. The combination of these two methods produces a tactile design with an equally eye-catching look.
Chasing and repoussé tools
It’s important that you pick up all the right chasing and repoussé tools before you get started. Here’s what you’ll need:
- A chasers pitch.
- A pencil or fine marker pen.
- Sheet gold, silver or copper.
- A selection of smooth round steel punches.
- A selection of blunt, chisel-shaped punches.
- A repoussé hammer.
- A hand torch.
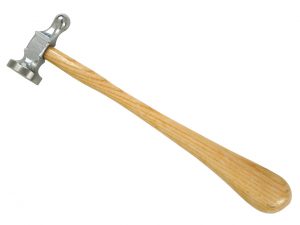
Repousse Hammer
The chasing and repoussé technique: step by step
Now you know what repoussé jewellery is and the tools it requires, it’s time to talk you through the chasing and repoussé technique itself. Just follow the steps below to get going:
- Make your pitch. The first step in the chasing and repoussé process is to prepare your pitch. Use a heat gun, hand torch or powerful hairdryer to heat up the pitch, before pouring or pressing it into a pitch bowl. As an alternative, you could use a leather cushion filled with sand or grit which should function like a standard pitch.
- Prepare your design. Using either your pencil or marker pen, highlight the area on the front of the metal’s surface to indicate where it will be pushed out from the back. Once done, curl the corners of the sheet into the pitch to keep it steady.
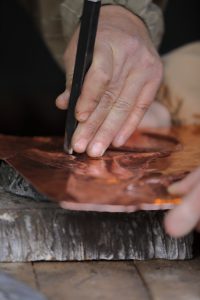
- Punch in the design. Next, use the blunt chisel punch to mark out the design. To do this, repeatedly strike the chisel with your chasing hammer until you have followed the whole line. Make sure you’re holding the chisel correctly too, at a slight angle with your thumb on one side and fingers on the other – touching either the pitch or the metal for further support.
Top tip! You’ll need to strike the very top of the chisel with the flat end of the hammer, gently enough to make a smooth line that will show on the other side of the metal.
- Repoussé the metal. Take your repoussé hammer and punches, turn the metal over and hammer within the areas that you have just marked out. Is the metal too hard to mould? Quickly anneal your design, cool and then try again.
- Prepare for chasing. Once you’ve repousséd the metal, remove it from the pitch and clean it before chasing. If there’s any pitch still left on the design, lay it on a soldering table and use a flame over it, then you should see the residual pitch flake off. Quench the metal by placing it in cold water until it relaxes.
- Redraw the design. Using your pencil or marker pen, draw the outline of your design once more. When you’re done, add it to the pitch the same way as before, front side up. Now you’re ready for chasing.
- Use your chasing tools. Make the repousséd areas really stand out by using your punches and chasing tools to push the metal further down, all along the lines you’ve drawn. Looking to add a pattern to the background? You can use marked punches at a right angle to the design to add more detail, just make sure you’re annealing every time you switch sides. This action will make the corners of the metal become slightly distorted, but this isn’t a problem as you’ll be cutting it away.
- Finish off the piece. Once you’ve removed your work from the pitch, you’ll need to anneal it once more, followed by quenching. When it’s dry, put it on a metal flat plate with the design facing upwards, and use a large round punch to even out the sides. Then take a piercing saw and cut off the edges, before filing to finish. And you’re done!
Ready to give this chasing and repoussé technique a go yourself? Make sure that you’re fully prepared with all the jewellery tools you need before you start. For more on the different techniques and equipment you can use, check out the beginner’s guide section of our blog.

Cooksongold