Learning how to use a crimping tool for jewellery making is one of the basic skills you’ll need to perfect as you work with beads in your career. If you’re new to beading and want some step-by-step guidance, you’ve come to the right place!
Here’s your complete guide on how to use a crimping tool. We’ll discuss what crimp beads and crimp tubes are, explore what a jewellery crimping tool can do and how to use it, as well as some advice on how to finish beautiful beaded pieces to a high standard and with a professional look.


What does a crimper do?
A jewellery crimping tool is used to help create beaded projects. A piece of beaded jewellery can be attached to a clasp in a variety of different ways, but the most popular and neatest way is through using crimps. We stock a selection of crimps, including crimp beads and crimp tubes. A jewellery crimping tool squashes either the crimp beads or crimp tubes together to secure the design, creating a professional finish.
What are crimp beads?
Unfamiliar with crimp beads and what they’re used for? Crimp beads are small beads with thin walls, made to be squashed and compacted into shape using crimping tools. They are used to hide the knots in your beaded necklace or bracelet that are holding your pieces together. Crimp beads can also strengthen these points in your jewellery designs, making sure your customers receive a piece of jewellery that will last.
What are crimp tubes?
Similar to crimp beads, crimp tubes are sections of tubing that are used to finish beading wire and jewellery projects.
Choosing the right sized crimp tubes or beads is important when it comes to giving your beaded jewellery a professional finish. If the size of your crimp tubes is a little too big for the wire you’re using, you may find that the crimp will not securely grip the wire in place, leaving your piece vulnerable to breaking later. You should also avoid using crimp tubes that are too small for the wire you’re working with. While it may fit, if it’s too tight the wire may not sit correctly in the crimp tube, making it difficult to secure it into place.
Crimp tubes are available in different diameters and lengths. However, jewellery makers who specialise in bead work often find that longer crimp tubes provide a more stable finish than shorter ones, but a shorter crimp may give you the neatest finish.
To make choosing the right sizes for crimp tubes simple, check out the manufacturer’s guide. Beadalon provides a handy, clear guide on which sizes of crimp tubes to use with wire sizes. Make sure you check each manufacturer separately however, as the sizes will vary from one to the other.
crimp beads vs. crimp tubes
Struggling to decide between using crimp beads or crimp beads? Confused about the difference? Don’t worry, it’s mainly down to your own preference. Both will essentially give a similar finish; however, you may find that crimp tubes are less likely to crack as you squash them into place with your pliers. Whereas crimp beads are slightly more fragile and harder to squash.
Remember that with crimp tubes, you can also squash them into a shape that closely resembles a bead anyway. So, it really does depend on the overall effect you would like to create with your final piece. Crimp covers are also a great option for a more professional finish, designed to fit over the crimp bead or crimp tube. They look like a bead, so it gives the design a more finished look.
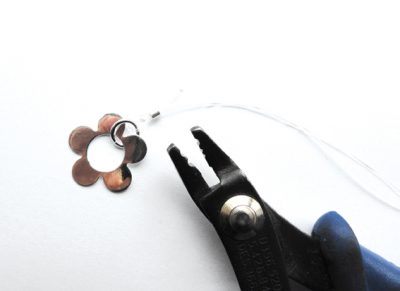
How to use a crimping tool for beading in 10 steps
- Get to know your jewellery crimping tool. Notice that your plier will have two notches. The one closest to the handles features a small dimple to help the crimp bead form a figure of eight. The notch that is closest to the tip of the pliers will fold the crimp, use this to form a tube.
- Take your chosen crimp tube or crimp bead and slide it onto the end of the wire you’re working with.
- Take the end of the cord and add your chosen finishing component, whether that’s a jump ring or a clasp.
- Now take the very end of the wire and pull it back through the crimp.
- Push the crimp closer to the jump ring or clasp, but don’t force it so that it’s too tight. Leave the jump ring or clasp a little space so that there is more movement in the piece.
- Once you’re happy with the position of the crimp, place it in the first notch of your jewellery crimping tool.
- Before applying pressure, make sure each wire end is separated. This will keep each wire in its own area of the crimp bead or crimp tube as it forms that figure of eight shape.
- As you apply pressure and squeeze the jewellery crimping tool, the small dimple in the notch of your pliers will position each wire end in its own compartment inside the crimp.
- Once your crimp is in a U-shape, you can now move onto the second notch of your pliers. Here you will need to place the crimp and squeeze the jewellery crimping tool, gently forcing the U-shape to fold in on itself.
- You should now be left with a tube-like bead that has secured each wire end neatly in place. Now you can trim the excess wire as needed, leaving you with a professionally finished piece.

Interested in getting to grips with other beading tools? Here’s how to use beading tools for beginners – a basic guide in using beading needles, reamers, and bead boards.
What size jewellery crimping tools to use

Before you buy your own bead crimping tool you may be wondering which size will be most useful to you. Generally, there are three different sizes of crimping pliers: micro pliers, regular pliers, and mighty pliers. Very small crimp tubes (between 0.8-1mm) will require micro pliers. Those that are slightly larger (between 1-2mm) will require regular pliers, and anything that’s 3mm or larger will require mighty crimping pliers.
Understandably, you may not want to invest in all of these jewellery crimping tools at once. Instead, you may want to try a multi-tool – jewellery crimping tools that allow you to work with varying crimp tube sizes. This a great way of saving money on tools and making sure that you try using different sized crimps before you settle on a size that works for you.
Now you know how to use a crimping tool, pick up crimp beads and crimp tubes in bulk at Cooksongold today. Alternatively, check out our other beginners’ guides for more tutorials and useful information for jewellers looking to expand their skillset.

Cooksongold