There are many ways to add texture to your jewellery – burrs, files and waxes are examples of techniques that add deep and pronounced texture to once plain surfaces.
Here we are going to show you a few quick and easy ways to add texture using a range of polishing tools, including our favourite the Garryflex.
Step 1:
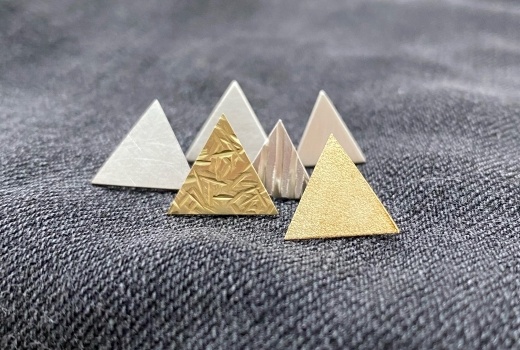
To show examples of a few different textures we have cut out triangles to make into mix and match studs.
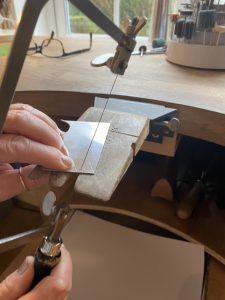
Mark out the size of your triangles onto the metal using a scribe. Cut out using your piercing saw, sawing on the outside of the line to leave room for filing or sanding later. Also, remember to keep that blade lubricated! We recommend having a block of wax screwed to your bench, easy to hand, to ensure your blade remains lubricated.
Sanding
You need to give yourself a good clean tidy base to work with, texture will not hide any marks or scratches and can highlight them even more. If you cut corners you will have to go back and fix it later, so it’s better to get it right at this stage to avoid going back and starting all over again!
Work through the emery papers, from 150 grit to 1,200 grit. At each stage ensure all your scratches have gone from the previous grit before moving onto the next. If you have pieces that are the same size, sandwich everything together with a small amount of superglue and sand the edges all at once to save time

Step 2:
Now it’s time to texture. Here are just a few of the many different textures you can create…
No 1
Garryflex – coarse
Garryflex is effective, yet quick and easy to use. Simply add texture using any motion you like, linear, circles or crosshatch. We have used a light pressure with a flicking motion in random directions to achieve a raw edgy scratched look.

Knife edge rubber wheel – Black
Firstly, remember to protect yourself as these frosting wheels can be dangerous. Wear safety goggles and protect your fingers. Hold small pieces in pliers to allow for a good grip and keep your fingers out of harms reach (You can also hold your piece in a ring clamp). Texture the entire surface with the frosting wheel using slow backwards and forwards movements. Next, I have added some stripes using the coarse black knife edge rubber wheel. Try and keep this straight and repeat a couple of times until you get the required depth to create a stunning contrast between the stripes and the shimmery texture.

Nylon Abrasive wheels gives a lovely matt finish. To give the piece interest use liner movements overlapping in a crisscross pattern.

No 4
White extra coarse knife edge rubber wheel
Using the edge of the wheel create little lined divots that go in random directions and overlap, so the whole surface is filled but not too deeply, just enough to see the pattern. This creates a really interesting effect with added depth.

No 5
Matt finishing abrasive wheel
Simply move the wheel in only one direction to create a lovely linear and subtle satin finish.

No 6
Frosting wheel – Green
Covering the entire area, use straight even movements and repeat the process to emphasise the detail further. This is the coarsest of the frosting wheels and gives a really shimmery finish

Step 3:
Soldering the posts
Ensure the backs of the triangles are clean, free from dirt and finger prints by giving a quick rub with 1,200 grit emery paper to allow the solder to flow easily. Line up your triangles on your soldering block and add a small amount of flux to the area where the post will be placed. You can measure and mark the point with a scribe or by eye.
Heat the solder pallions and scoop them onto the posts and then bring the post over to the piece, heat the piece and solder on the post. (You can also sweat solder the solder to the earring first and then add the post if you prefer). Quench in water and place in the pickle.

Step 4:
Final polish
Once out of the pickle the backs may need a bit of a clean-up. We recommend pink scotchbrite radial discs, which will clean up nicely without damaging the clean-up you did prior to pickling. If the fronts need a bit of attention, top up some textures or lightly polish any areas you would like to “pop” with a soft wool mop and rouge

And there you have some little textured studs to mix and match. There is so many textures you can make using different tools, so have a play around and see what you create. Always remember to stay safe by wearing the correct PPE – enjoy!

We want to know what you’ve been making! Share your creations with us on social media, tagging in Cooksongold on Facebook, Twitter and Instagram

Zoe Jane Jewellery
Loving to experiment and delve into a variety of processes, I combine both modern and traditional techniques. These include lost wax casting, stone in place casting, delft clay casting and the ancient art of granulation. Each individual piece is personally handmade by me in my studio on the gorgeous Essex/Suffolk border, alongside my 7 cat helpers.