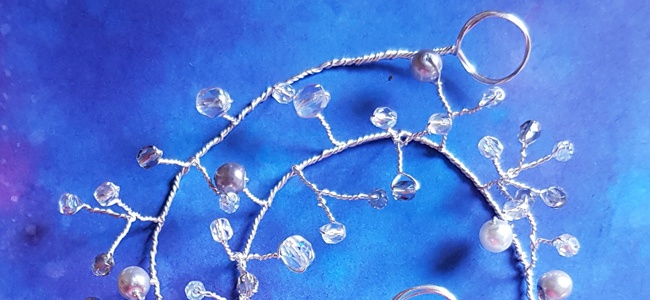
This is a guest project designed by Jane Kharade. Jane designs beautifully coloured pieces with the aid of clay, crystals and silver.
“Create unique accessories for your own wedding or a friend’s special occasion, with easy to use rubber moulds and precious metal clay.”
Mould pretty charms from silver clay to form Jane Kharade’s wedding gift jewellery.
Use a flexible rubber mould and precious metal clay to create these stunning keepsake gifts for a wedding, all of which can be worn after the special day has long gone. The mould features a selection of pretty elements, that can be used to create charms suitable for a number of occasions. Find out how to design a pretty pendant and stunning charm bracelet for the bridesmaids, embellished with glittering Swarovski crystals, plus striking cuff links for the best man.

You will need:
- Bicones, SWAROVSKI ELEMENTS, 6mm, light peach x 11
- Crystals, round, SWAROVSKI ELEMENTS, 6mm, Indian pink crystals x 11
- Chain: snake, sterling silver; plain curb, loose, silver
- Jump rings, silver: 5mm, light ; 7mm, heavy
- Head pins, 3 bead end, silver, 50mm
- Clasp, lobster clasp, 13mm
- Clay, precious metal, PMC 3 x 25g
- Cuff links, silver
- Mould, flexible rubber, Occasions
- Badger Balm
- Needle
- Pliers: round-nosed; flat-nosed
- Cutters, wire
- Mat, Teflon
- Blow torch, hand-held
- Soldering block
- Brush, wire
- Files, needle
- Burnisher, metal
STEP 1
Lightly coat a teacup, teapot, flower, shoe, bonnet, and dress moulds with a thin layer of Badger Balm, using your finger. This will stop the clay from sticking to the mould and damaging the pattern of the charm as it is being removed. You will need to make up six flowers and one shoe, dress, bonnet, teacup and teapot charm for this project. Form each one individually by pinching a piece of precious metal clay from the block, then wrapping the rest back up to stop it from drying out.
STEP 2
Roll the clay into a ball and press it into your chosen mould, then push a needle into the charm to create a large hole for attaching a jump ring. Bend the mould slightly and carefully release the charm out; if the clay doesn’t have a good impression, simply ball it up and re-mould. Lay the charms on a Teflon mat to dry out overnight; once they feel like plaster, use needle files to remove any rough edges and create a smooth finish.
STEP 3
Fire the charms on a soldering block with a blow torch until they glow orange, then maintain this glow for a minimum of two minutes. Alternatively, fire in a PMC kiln on the PMC3 fast programme or 700°C for 10 minutes. Quench in cold water, then brush the charms with a wire brush, front and back, and use a metal burnisher to polish the high points. Thread each charm onto a 5mm jump ring. Hang them from a 18cm curb chain at regular intervals so that the charms are balanced throughout the bracelet.
STEP 4
Thread 10 pink crystals and 10 peach crystals onto head pins. Use round-nosed pliers to form a neat loop. Wrap the end of the head pin around itself three times and trim the excess. Thread one pink and one peach crystal onto 5mm jump rings then hang them between each charm. Attach a lobster clasp to the bracelet with a 5mm jump ring to one end, and a 7mm jump ring to the other.
STEP 5

You have completed the project. This is the finished Special Occasion bracelet. You can get everything you need to design it by clicking here. Have fun making your own!
You could also try…
Pendant
Step 1: Lightly coat a teacup and a flower mould with a thin layer of Badger Balm. Pinch a piece of precious metal clay from the block, divide it in two and push each piece into the teacup and flower moulds. Make holes in the charms with a needle for the jump rings, then carefully ease them out of the mould.Leave the charms to dry out overnight, then remove any rough edges with needle files. Fire the charms with a hand-held blow torch, quench and brush with a wire brush, then use a metal burnisher to create a mirror finish on the high points.
Step 2: Add a 5mm jump ring to each of the charms. Thread one pink and one peach crystal onto individual head pins. Using round-nosed pliers, form a neat loop and wrap the end of each head pin around itself three times with the aid of flat-nosed pliers, then trim off the excess. Open up a 7mm jump ring with pliers and thread the two crystals onto the jump ring, add the teacup charm and close tightly, then slip it onto a snake chain. Add the flower next to this.
Cufflinks
Step 1: Coat the top hat mould with a light film of Badger Balm. Pinch a piece of precious metal clay from the block, roll into a ball and push it into the top hat mould. Carefully ease the charm out, lay on a Teflon mat and repeat to make a second charm. Once they have dried out overnight, remove any rough edges with needle files.
Step 2: Fire the charms on a soldering block, quench and brush with a wire brush, then use a metal burnisher to polish to a mirror shine. Mix up epoxy resin according to the manufacturer’s instructions. Stick the top hats to cuff link findings and leave the resin to cure overnight.
Designer Tip
Take care when filing the charms after they have dried, as they can be fragile in this pre-fired state.