Whether you’re new to enamelling or you’d just like to brush up on your knowledge, we can help. In our guide on how to enamel jewellery, we’ll talk you through the ins and outs of the enamelling process to help get you started.
What You Need for Enamel Jewellery Making
How to Enamel Metal
Step 1: Preparing the metal for the enamelling process
Enamelling metal is safe with a number of different alloys. Here are some top tips on preparing your metal ready for the enamelling process.
Enamelling is most commonly done on copper, fine silver and 18ct or 22ct gold.
Please note that alloys containing zinc and nickel are unsuitable as the enamel tends to react and not fuse to the surface.
When learning how to enamel jewellery, it is always worth remembering that cleanliness is key, and each metal type requires different preparation:
- Copper – prepare your metal by using abrasive papers to remove any oxides. We then recommend you pickle the metal before applying any enamel to make sure it’s clean.
- Fine silver and gold – clean the metal using a brass brush. Or, alternatively, use a glass brush under running water with protective gloves on.
Once your metal is cleaned and prepared you can get started with applying the enamel. We have put together some basic step-by-steps which you can follow here:
Step 2: Counter Enamel
Metal warping due to the high temperature of the kiln can cause cracks in enamel, so it is important to apply a layer to the back beforehand. This will create equal stress on both the front and back of the piece and help to prevent impurities. You can do this by applying a layer of counter enamel to the piece.
It’s worth noting that flat, thinner and/or larger pieces of enamelling metal are more like to warp, rather than domed pieces.
As a general rule, we suggest:
- 1mm or lower should be counter enamelled
- 1-1.3mm may need to be counter enamelled, depending on size and shape
- 1.3mm or thicker does not usually need to be counter enamelled
The counter enamelling process is typically sifting, wet packing or using liquid enamel.
Step 3: Applying Enamel
Depending on the enamels used, and the desired effect, a variety of methods can be used when learning how to enamel jewellery:
- Sifting – dry powder can be applied directly onto the metal or over a flux layer
- Wet process – finely ground powder is mixed in water and can be applied to the metal using a paintbrush.
- Painting Enamel – special painting enamel powder is mixed with a painting medium (often pine oil) and painted onto the surface of a flux or coloured layer (usually white) while being fired in layers.
- Liquid enamel – can be painted, sprayed or dipped.

Step 3: Firing
Any moisture needs to be dried off before firing, especially oil from a painting medium, as it will burn. You can do this by leaving wet pieces under a lamp or on a trivet above the kiln.
Firing times will vary depending on the piece and the temperature of the kiln – it is usually between 30 seconds and two minutes. Don’t forget to check the temperatures of your kiln before you start firing.
When firing, the enamel will go through three stages as it melts:
1. Crystalline/granular
2. Orange peel effect
3. Smooth and fully fired
Health and Safety Tips for enamelling metal
You should be mindful of these health and safety considerations while learning how to enamel jewellery:
- Keep the work area free from food or drink to avoid contamination and accidents
- Enamel is a powder, so use it in a well-ventilated area and use a respirator mask designed for dust
- Wear heat-protective gloves when taking items in and out of the kiln
- Wear protective goggles to protect eyes from shards of fired enamel which may ‘ping’ off a piece, and use welders’ goggles if firing for long periods of time, or vocationally
- Use water when sanding or stoning enamel to prevent inhalation of airborne glass particles
- Pieces coming out of the kiln are HOT! Allow them to cool completely before handling
Top tips on how to enamel jewellery
- Cleanliness and keeping colours separate and uncontaminated is key to successful enamelling
- Finished enamelled pieces will not withstand being heated again. Think about how you can solder beforehand, as well as cold connections and set pieces into mounts
- Finished pieces are fragile – protect them and treat them with care
And that’s how to enamel jewellery! Want to get started? You will find what you need to follow the enamelling process in Cooksongold’s extensive range of enamelling supplies. For an extra helping hand, why not browse our selection of enamelling books? They’ll give you more ideas and tips on how to enamel metal at home, as well as spark some inspiration!
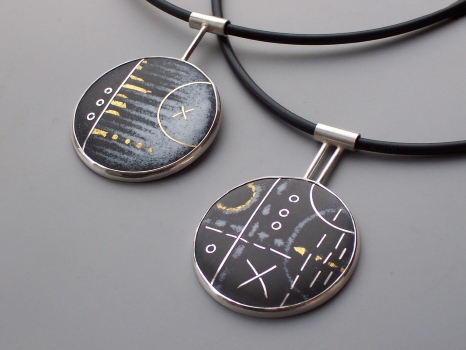
Please note the first image in this blog contains necklaces made by Ruth Ball from her book, Enamelling by Ruth Ball

Cooksongold