 Interested in discovering a new jewellery making technique? Making your own necklace clasp can add a personal touch to your handmade efforts, while matching the rest of your jewellery in a more natural way.
For our step by step guide on how to make a necklace clasp, keep on reading. We’ll talk you through the supplies you’ll need and how to use them to make your own DIY necklace clasp.
Tools for making necklace clasps
There are a few essential tools you’ll need for making a necklace clasp before you get started:
- 1mm wire (choose the precious metal wire of your choice)
- Wire cutters
- Round nose pliers
- Long nose pliers
- File
- Jobbing hammer
How to make a necklace clasp: step by step
Making the first part of the necklace clasp (a simple hook)
- Step 1: Use your wire cutters to cut a piece of wire roughly 5cm long, then file down the rough end of the wire.
- Step 2: Bend the filed end of the wire with your long nose pliers at approximately 2mm, and make sure that it’s at a 30-degree angle. Taking your round nose pliers, shape the wire into an almost complete circle so that it creates a small hook.
- Step 3: With a pair of long nose pliers, bend the wire at a 90-degree angle at the bottom of the hook made previously. Next, make a smaller loop with your round nose pliers. Once this is done, use a portion of the remaining wire to wrap around the bottom of the hook. This will tighten up the loop, securing it in place and also nicely finishing off this section with a wire wrap. This will be used to connect the clasp to the rest of the necklace. At this stage, this part of the clasp should look like a hook with a small loop at one end.
- Step 4: To finish the hook, remove the excess wire with your wire cutters. Once done, file down the end of the wire on the hook (that you’ve just cut) to prevent harsh edges on the clasp. Next, use your long nose pliers to squeeze the two ends of the hook together.
- Step 5: Keeping the small loop in shape, lay the clasp down and hammer the edge of the hook. Repeat on the opposite side of hook (on the larger rounded end). This will leave you with a more finished look by adding some texture and will improve the durability of the necklace clasp by hardening the metal.
Making the second part of the necklace clasp (the eye to your hook!)
- Step 1: Using your wire cutters, cut another piece of wire (roughly 5cm again) and file the rough end. Bend it at 90-degrees with your long nose pliers at 2mm.
- Step 2: Create a small loop using the other side of the wire, by bending it at 90-degrees with your round nose pliers. Once this loop is done, with the left-over wire, wrap it around the middle of the two loops – making a rough figure of 8 shape.
- Step 3: To finish off this part of the necklace clasp, you’ll need to cut away the remaining wire and file the edge down. Next, squeeze the middle with your long nose pliers. Gently hammer the edges of the two hoops to finish.
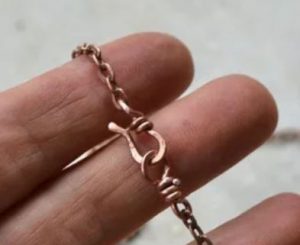
- Step 4: Your DIY necklace clasp is complete! You can choose whether you’d like to apply it directly on a chain, or you can use it between two jump rings.
Now you’ve read the steps on how to make a necklace clasp, why not try making one for yourself? Stock up on jewellery making supplies at Cooksongold.

Written by
Cooksongold