
Create a beautiful necklace and earring set to shimmer and shine this holiday season. Using sterling silver and metal stamps you’ll learn to cut, texture and form sheet metal into finished pieces of jewellery.
In addition to the above listed in the kit list you will also need:
- A chain of your choice
- ImpressArt Design Stamps
How to make the pendant:
Step 1: Select your stars
Using the star punches from your disc cutter choose 3 different sizes that complement each other.
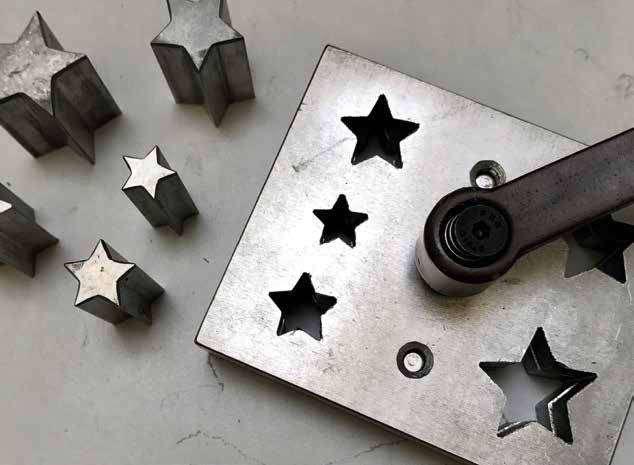
Step 2: Place the sheet
Select the best placement on the silver sheet, then clamp the sheet into the disc cutter. Using a scrap piece of metal the same thickness on the opposite side to your silver will stabilise the disc cutter.

Step 3: Make the cut
Use your 2lb hammer to punch your silver stars. Place your stars on your bench block and using your ImpressArt stamps create a random pattern across your stars – there really is no ‘right’ design here!
If you need to flatten your stars again after texturing use a nylon hammer as it leaves no marks. You can protect the design by using a piece of scrap leather on the block.
Step 4: Prepare to drill
Use your centre punch and hammer to mark each star where you’ll drill for your jump rings as it stops your drill from skittering across your metal. Remember you only need 1 hole in the small star as it’s for the end of the drop.
Move your stars to a benchpeg or wood block and drill your holes. Then use your ball burr, file or sanding stick to remove any sharp metal from the holes just drilled and also from the edges of your stars.
If you have a tumbler you can use it to give your stars an extra shine or polish using your favourite method.

Step 5:
Join the stars.
Link your star cascade together using oval jump rings and pop onto a chain to complete your necklace.

How to make the earrings:
Step 1: Create your stars
Follow the initial steps above to cut and texture your stars.
To make your ear wires, use 0.8mm sterling silver wire and turn a small loop with your round nose pliers, then create the ear wire shape with your pliers.

Step 2: Prepare your wire
Use the cup burr (or sanding stick) to smooth the end of the ear wire and work-harden using your steel block and nylon hammer.

Step 3: Close the show
Open the small loop as you would a jump ring and add your textured stars, close again and wear with pride.
You can make these earrings in a number of varieties, single or double stars, drops similar to the pendant, textured or plain – have fun & see what you can create!

We hope you enjoy making your very own snowy star pendant and earrings . If you have any questions or want to know more, get in touch with us on Facebook, Twitter and Instagram. We’d also love to see what you’ve been making so please share pictures of your creations with us too, tagging @Cooksongold.

Laura Grey