
In this step-by-step guide, we’ll show you how to craft a stunning gold-filled shamrock necklace. Whether you’re looking to enhance your jewellery-making skills or create a unique charm to wear or gift, this tutorial is an easy step into the world of jewellery making and will help get to grips with making your own necklace easily.
What is Gold Filled?
Gold filled jewellery is growing increasingly popular, why? It is both easy to work with and cost efficient. Gold filled is a layer of either copper or brass, that has been coated with gold, usually the gold layer makes up only 5% of the total metal. Gold filled jewellery is both resistant to tarnish and durable and for new jewellery makers or jewellery makers simply looking for cost savings, this is the ideal alternative to precious metal.
Gold Filled Necklace: Step by Step Guide
Start making gold filled jewellery today. Our step by step guide is easy to follow for jewellery makers of all skill levels.
What you Need:
- Pack of 10 5mm gold filled jump rings
- Pack of 5 gold filled hearts
- 18 inch gold filled trace chain
- Extra Easy 9ct gold solder panel
- Soldering Kit
- Micromesh Starter kit
- Gold polishing cloth
- Flat nose pliers
- Chain nose pliers
Step 1
Close one of the 5mm gold filled jump rings by gripping either side of the hoop and twisting inwards to close the ends flush.

Step 2
Place the hearts on a soldering block to form a shamrock shape and add the jump ring in one of the gaps. Ensure that all the hearts and the jump ring touch. Add flux to all the places where the gold filled pieces touch and place on small pieces of gold solder.
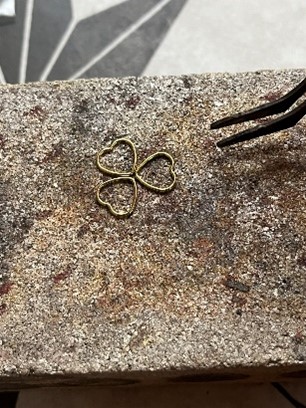
Step 3
Heat the gold solder until it melts and joins the pieces together.

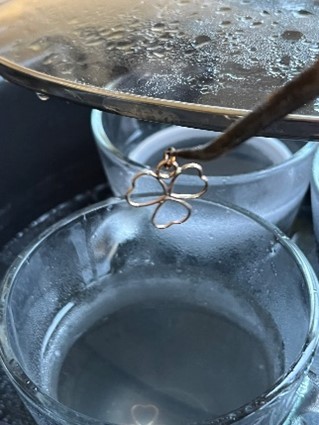
Step 4
Leave to cool a little and then pick up with tweezers, quench in water and add to a warm pickle solution to clean. Leave for 10 minutes or until clean, remove and rinse in water.
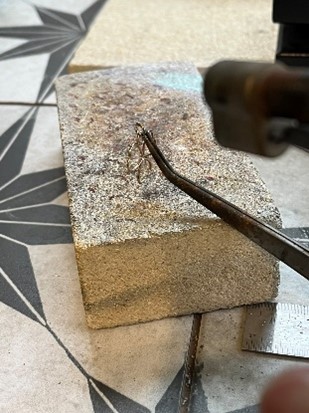
Step 5
Place the gold filled shamrock pendant on a steel block and gently tap a hammer on the outer edges to flatten them. You may need to hold the shamrock with your fingers, in which be careful not to hit your fingers with the hammer.

Step 6
Leave to cool a little and then pick up with tweezers, quench in water and add to a warm pickle solution to clean. Leave for 10 minutes or until clean, remove and rinse in water.
Note: A soldering pick can help to put the solder in the right place if it moves away from the joint when heating the solder with the blowtorch.
Step 7
When dry clean off any excess solder with micro-mesh and use a polishing cloth or tumble barrel polisher to add shine. Thread the gold filled shamrock pendant onto the gold filled chain.

It is just that simple. Making a gold filled necklace is a fantastic project whether you are new and unsure of where to start or your an experienced jeweller who wants to start working with different metal options.
We stock an extensive range of gold filled findings and chain so you’ll find everything you need. Our step by step guide is just one project but why not take a look at our other projects to start making different types of jewellery today? If you do make this gold filled necklace then don’t forget to share your image on our social media accounts!

Sian Brown
Sian has been hand making her award winning jewellery in the West Midlands for over 12 years. Sian spent 10 years in Birmingham’s historic Jewellery Quarter before relocating to a quiet Worcestershire village.