In addition to the kit list above you will also need the following:
- Toothbrush
- Tin lid or alternative
- Bowl of water
Step 1:
Prepare your copper.
Your copper needs to be clean and grease free, otherwise the enamel may not stay on the copper. In this project you will only enamel one side, so only clean that side. Use 600 wet and dry paper to remove any oxides. Then abrade the metal with a brass brush, dampened with water with a small drop of washing up liquid.
Finally, use an old tooth brush to remove the soapy water and rinse under running water. If any areas resist the water, re-clean with the brass brush and tooth brush. Dry your metal with a clean paper towel – make sure you do not touch the surface of the copper.

Step 2:
Add the first layer of enamel.
Use a clean, shiny page from a magazine on top of your bench – it’s a good idea to do this away from the area where you will use your torch. Rest your copper disc on top of two mixing sticks, or coffee stirrers. Put your first enamel powder into a sifter – wear a face mask to do this. Overlap the edges of the metal as you sift the enamel powder. You’re aiming for a thin, even coat. I used Ivory Opaque for my first layers.

Step 3:
Get ready to fire.
Place your tripod onto a fire proof surface – I use an old biscuit tin lid. Carefully lift your metal using a pallet knife. Your copper with the sifted enamel rests on top of the steel mesh. Fire your copper from underneath – pointing the flame at the underside of the copper at about 45 degrees. Move the flame in a circle to ensure an even heat.

Step 4:
Fire.
As you heat the copper from underneath you should see the enamel change. During the first stage the enamel will look like sugar, then it will resemble orange peel, before a shiny stage. You can stop at any time to check and restart the process. Remember it will be very hot! Stop at the shiny stage.
Step 5:
Remove the loose fire scale.
Leave the copper on the tripod to cool down, then place it into a bowl of water and remove any loose fire scale from the back of the metal. Dry the metal.

Step 6:
Add more layers.
Add a second and third layer of your base enamel colour following steps 4 and 5. When you have finished with your first colour, carefully tip any loose enamel powder back into the container using the magazine page. Make sure each layer is thin and build up the layers slowly. If the enamel is too thick it will come off.

Step 7:
Build up the colours.
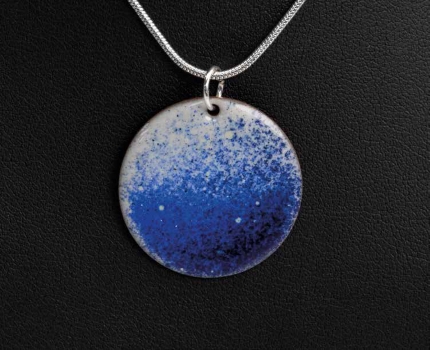
Sprinkle a second layer of your second colour to the bottom part of your disc, I used Lapis Blue Opaque. Fire this as before, then add a third sprinkling of colour, I used Blue Black Opaque. You are aiming for a glossy, shiny surface on the enamel. Fire again and leave to cool.

Step 8:
Clean up the copper.
When you are happy with the colours you can clean the fire scale from the copper. Use a half round file to gently file the edges, taking care not to chip the enamel. Use 600 grit wet and dry to clean the back and edges. I used a course radial disc with a Dremel to finish my piece.

Step 9:
Finish your pendant.
Copper tarnishes easily, I add Renaissance Wax to help slow this process down. My pendant has a Silver plated snake chain, attached with a 6mm jump ring.

Step 10:
Finish your design.
I used a half round needle file and 600 and 1000 grit wet and dry papers to smooth my Silver pendant, before polishing on my polishing motor. Complete the design with the Silver snake chain and 5mm jump ring.


Christine Pearson
I make one off commissions in gold and silver, Jewellery in Enamelled Silver and Copper. I design and make individual jewellery which I sell at Art and Craft events and in my Etsy shop.