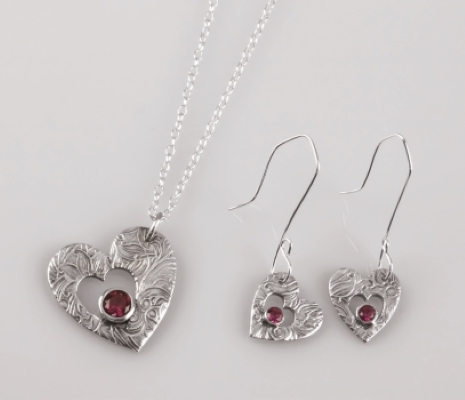
Make a beautiful textured heart set with stones, perfect for someone special.
See the video edition of this project:
Step 1:
Rolling out the clay and texturing.
Spread Badger Balm on a tile, the brass texture plate and your hands.
Using the thicker spacers, roll out the clay so that it is of a size you can almost fit the cutter on.
Lift the clay using the flexible cutter, place it on the brass texture plate and align your thinner spacers or playing cards next to the clay but on top of the texture plate.

Roll the clay once with confidence to add texture, then use the flexible cutter to lift the clay and turn it over onto the tile with the texture facing upwards.
Step 2:
Cutting the shapes.
Choose 2 cutters with at least 2mm difference in size for the pendant and the same for the earrings. Remember that the clay will shrink about 8-9% depending on your method of firing.
Cut out the outside shape, then position the smaller cutter on the clay until you are happy. I slightly offset mine to add to the handmade look and design.
Cut the inside shape. Remove the excess clay from the outside of the shape and the inside shape using the needle tool. Repeat step 1 and 2 until you have a pendant shape and 2 earring shapes. Dry these pieces in your normal way.
Note: I use a kitchen hostess tray for food warming to dry my clay pieces, but you can use tea warmers, dehydrators or some kilns have a drying program. If you do not have any of this equipment leave your pieces somewhere warm to dry out overnight.

Step 3:
Setting the stones.
Take a small piece of art clay about twice the size of the stone and roll into a ball. Choose your stone and gently press it into the clay until the table of the stone is below the surface of the clay.
You can use cards or spacers each side of the ball and the roller to get a perfectly flat stone table, just make sure you have enough clay underneath the stone or you will get a dimple or hole after firing.
If the surround is too big you can cut the clay while wet, but be careful you don’t pull the clay away from the stone or it will just drop out of the setting. The other alternative is to sand it down after drying and save the sandings to make paste. Dry the stones in your normal way.

Step 4:
Sanding the pieces.
Using sanding pads then several grits of emery papers, sand the base, sides and inside of your pieces until they are smooth. I usually go down to about 6000 grit. The more time you spend at this stage of the process, the better the finish after firing. For heavy sanding or to sand the inside of the shapes you can also use needle files. Make sure all sandings are removed from the top of the stones as any specks will fire into solid silver and stick to the stone and you will be able to see them on the finished piece. A soft brush is very useful for this.
Always support the area you are sanding so you don’t accidentally break the piece as it is very fragile. Only use very little pressure, let the papers do the work for you.

Step 5:
Attaching the stones.
Once your pieces are sanded it is time to attach the stones. Decide where you want to attach the stone, squirt a small amount of paste on the pendant/earring piece, then brush a small amount of water on the stone.
Press the wet part of the stone against the pendant/earring piece and hold until it starts to stick. Gently use the rubber tipped tools to wick away any visible excess art clay from the front of the piece. It will still be soft so be very careful you don’t press too hard and move the stone away from its position.
Dry the piece, then use paste to fill in any gaps on the rear of the piece and again dry the piece. Repeat step 4 until you are happy your piece is smooth. You should be able to see a dark grey colour to the piece if you have refined it enough.

Step 6:
Firing.
Your pieces need to be totally dry before firing to prevent bubbles and holes.
Drill small holes in each piece to make room for the ear wires or jump rings. When you drill the hole, it is advisable to use a hand drill and not to put any pressure on the piece as it is very fragile.
Once you are happy with how the piece looks, it is ready for firing. Any lumps/bumps/scratches you can see now will be visible after firing, so make sure they are removed by sanding or filling with paste.
You can now fire your piece using one of 3 methods:
Method 1 – Using a kiln
The packaging suggests firing at 650 deg C, which is the minimum firing temperature. I find that firing at 830 deg C for about 35 minutes gives me the best results and stronger pieces. As the pieces have stones in, it is best to let the pieces cool completely before removing from the kiln, do not be tempted to cool them using water as this will crack the stones.
Method 2 – Torch firing
You can fire the pieces using a cook’s torch such as ‘Hand Torch, Please Note Jewellers Torch Is Supplied Without Gas – 999 955’. Place the piece on a solder block or heatproof surface and gently heat each piece separately until they glow pale orange and hold at this temperature for 3-4 minutes each piece. The binder will catch fire, just keep heating till the flames die away.
Move the piece out of the way to cool. Don’t be tempted to cool in water or this will crack the stones.
Method 3 – On a gas hob
Place the grid over your hob and switch the gas on. Once it is up to temperature carefully add your pieces and leave in the hot areas for 7-10 minutes. Again, allow to cool gently to protect the stones.
Once fired, the pieces will appear white, but are now solid silver. Rub a brass brush over the pieces until they are all silver. You can now use the emery papers wet to add a final polish to the back and sides of the pieces if required.

Step 7:
Adding colour.
To pick out the texture detail use a solution of liver of sulphur (oxidising liquid) and warm water. The hotter the water you use, the quicker the silver will go black. You can get a range of colours from golden through to black using the correct temperature and dipping the piece in for different times.
Add a little liver of sulphur solution to a heatproof pot and pour over some warm water. In another pot make up a solution of bicarbonate of soda and water to neutralise the liver of sulphur. Use plastic tweezers to dip the piece into the liver of sulphur solution. Dip in for a few seconds and lift out to check the colour. Once you are happy with the colour, drop it into the bicarbonate of soda solution.

Step 8:
Polishing.
Take the pieces out of the bicarb of soda solution and dry off with some kitchen roll. Add a little polish to a soft cloth and rub it into the cloth. Rub the pieces with the polish impregnated cloth until you are happy with the result. This will polish the raised areas of the texture while leaving the deeper areas coloured so highlighting the pattern and adding depth to the piece. Make sure you polish the back too.

Step 9:
Finishing your pieces.
Once polished, add a jump ring to the pendant piece and make up your chain using the chain, bolt rings and jump rings. Add ear wires to your earrings (I make mine, but you can purchase them ready made).

For more information on LR Silver Jewellery see www.facebook.com/lrsilverjewellery or www.lrsilverjewellery.co.uk

Lori Ridgway
For me a piece of jewellery is something special, especially a piece in silver. I love creating beautiful pieces of silver jewellery from your story or your memories that can be treasured forever. You talk to me about what you would like to say with your gift or piece, and together we can design something just for you or your loved one.