Whether you’re a beginner jeweller or a seasoned maker refining your skills, learning how to solder gold is a vital part of a jewellery-making journey. Soldering allows you to create seamless joins, repair pieces, and bring intricate designs to life. In this guide, we’ll walk you through the essentials of gold soldering and recommend the best tools and products you need.
What Is Gold Soldering?
Soldering gold involves joining two or more pieces of gold using a filler metal called solder, which has a lower melting point than the workpiece. The solder flows into the joint when heated and bonds the pieces as it cools.
Unlike base metals, gold requires more care and precision due to its value and sensitivity to heat and contamination. The right equipment, solder type, and technique make all the difference.
What You Need to Solder Gold
Before you begin soldering gold, gather the essential tools and materials. Cooksongold offers a wide selection of high-quality products perfect for jewellers of all levels:
Gold Solder
Choose your solder based on carat, colour, and flow temperature:
Tip: Use easy, medium, or hard solder depending on the order of your joins. Start with hard solder for the first join, then progress to easy solder to prevent re-melting previous joins.
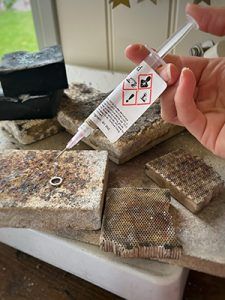
Flux
Flux helps prevent oxidation and allows solder to flow smoothly:
- Easy-Flow Flux Powder – Mix with water to create a paste.
- Auflux Soldering Fluid – Ready-to-use liquid flux.
Torch
A precision torch gives you the control and heat intensity needed:
Soldering Board or Brick
Protect your work surface and reflect heat back to your piece:
Pickle Solution
Clean oxidised metal after soldering:
Step-by-Step: How to Solder Gold Jewellery
1. Clean Your Metal
Thoroughly clean the gold surfaces with emery paper or a fine file. Any dirt, grease, or oxidation will prevent the solder from flowing correctly.
2. Position the Join
Fit the pieces together as snugly as possible. Use reverse-action tweezers or a third hand tool to keep the join stable.
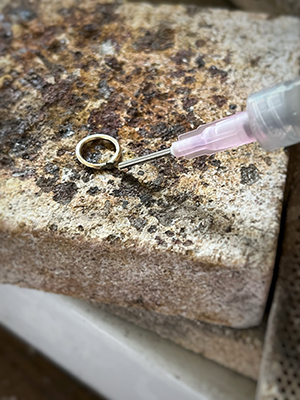
3. Apply Flux
Brush a small amount of flux onto the join area. This prevents oxidation and allows the solder to flow evenly.
4. Add Solder
Cut small pieces (pallions) of solder using snips. Place them directly on the join using a soldering pick or fine tweezers.
5. Heat the Piece
Using your torch, gently heat the entire piece until it reaches soldering temperature. Focus the flame on the surrounding metal—not directly on the solder. Watch for the solder to flow and fill the join.
6. Cool and Pickle
Let the piece cool slightly, then quench it in water. Place it in your pickle solution to remove oxidation.
7. Rinse and Finish
Rinse the piece in clean water, dry it, and continue with polishing or further assembly.
Common Mistakes to Avoid
- Overheating: Gold can pit or melt if overheated. Move your torch evenly and avoid lingering.
- Using too much solder: Less is more. A small piece of solder will flow far if the join is tight and clean.
- Skipping cleaning: Oxidised or greasy surfaces won’t solder properly.
And that is how to solder gold jewellery. Feel like giving it a go yourself? Pick up all the jewellery tools you need and head to the equipment and technique focus section of our blog for more.

Cooksongold