By Jo Varney
There are many different ways to solder two pieces of metal together, and in time you will undoubtedly develop your own preferred method. However, there are some basic rules which should always be adhered to – to demonstrate, here I will take you through a very simple way to solder a band ring together, one of the first soldering operations I ever attempted whilst studying jewellery at university.
How to solder a band ring together:
- Measure and cut your material to the correct length to achieve the required ring size. You will probably start with silver sheet, and the width and size is down to personal preference, but I started with a piece approx. 0.9mm thick x 6mm width.
2. Anneal the metal (until it becomes a dull red colour), and hammer round a mandrel so the two edges are as close as possible. Remember to keep turning the ring from back to front whilst shaping, to avoid it becoming too tapered.
3. Push the two ends of the ring together so one is on top of the other, then allow them to spring back which should leave them touching. This can be done using a nylon mallet or by hand.
4. You need to get the ends in full contact with one another, so secure the ring firmly in a clamp, vice or between your fingers, with the join at the top, towards the centre. Then, gently saw through the join until your gap has parallel sides, and fits together flush with no gaps. You may need to repeat this process a number of times until the join is perfect.
5. Remove the ring from the vice or clamp, and lightly rub over each surface surrounding the join with emery paper to de-grease it ready for soldering.
6. If using binding wire, wrap a piece round the circumference of the ring, then bring the ends together and twist tightly to firmly pull the ends of the ring together.
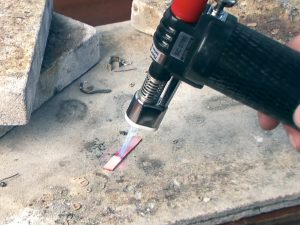
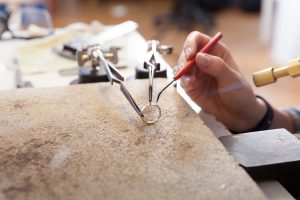
7. Place the ring onto your heat resistant surface, and apply flux to the join (the ring can be securely held using reverse action tweezers or a third hand tool).
8. Heat the flux gently to dry it before applying the solder. This helps to prevent the solder jumping off as the flux bubbles.
9. Place tiny pieces of degreased, hard solder along the join with tweezers.
10. Take your blowtorch in one hand and a soldering pick or tweezers in the other, and gently begin to heat the ring using a fine blue flame.
11. Keep the flame moving at all times, and pull back if one area starts to glow bright orange ahead of the rest of the piece. You are aiming for an even and consistent heat (and colour) across the whole piece, not just the area to be joined, so ensure the flame is kept moving.
12. As the ring reaches temperature and becomes a brighter shade of orange, your solder is about to melt or run. It will happen very quickly just before the metal itself starts to melt, so you need to react instantly.
13. As soon as you see the flash of silver run along the join, move the flame away at once. If it doesn’t seem to be working, it can often help to apply the heat underneath the join to draw the solder through the gap.
14. Quench the ring in water, and remove any binding wire before placing in a warm pickle solution to clean.
If your soldering has been unsuccessful, it may be for one of the following reasons…
- The join was not flush, so the surfaces were not in full contact with one another (you should not be able to see any light through the two pieces to be soldered).
- The ring was not heated evenly, which prevented the solder from melting.
- The metal or the solder were not thoroughly de-greased.
- If the solder didn’t run where you wanted it to, it may be because you didn’t apply your flux accurately enough. Only apply flux to the specific area to be soldered, don’t splash it around all over the place!
Once you have established the problem, simply clean your piece thoroughly and try soldering again.
Before you begin your soldering journey, it is important to ensure your workspace is well prepared with the right tools for the job, so read this blog post to find out more about the essentials you need to get started. Want to explore jewellery soldering further? For more details on silver soldering in general, you can also take a look at this article from our Technique Focus series.

Cooksongold