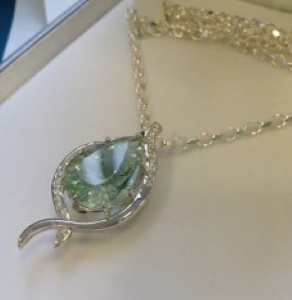
Our Design of the Week winner Aimee Louise Booth (of Aimee L.B Jewellery) talks us through how she made her winning design. Aimee created an intricate gemstone pendant necklace with a complex basket setting design. Here, she walks us through the process of how to make your own necklace with a detailed prong setting so that you can experiment with intricate basket settings in your own designs.
This pendant was inspired by and based mainly around the beautiful, large green fluorite stone that features in the centre. I’m a student at the Birmingham City University School of Jewellery (just over the road from Cooksongold) and I spotted this stone as one of my gemologist friends was taking part in a gemstone sale of unwanted specimens, It’s a beautiful millennium cut fluorite (calcium fluoride) and has a wonderful sparkle and amazing mint green colour. I snapped it up as soon as I saw it, and as I was taking part in a part-time course in the next few weeks I decided I’d be taking it along with me and hoped I’d create something really unique with it. So here’s a step-by-step guide on how I made this pendant, looking in more detail at how to make a basket setting and adding the finishing touches to the piece, all done with the wonderful help of the amazing jeweller and part-time lecturer, Richard Witek.
Step 1

I created the basket setting for the fluorite; it’s always a good idea to work from the centre of your piece, outwards. This basket setting was created in 0.8mm sterling silver round wire. Start with creating the pear shape, bend the metal into your shape with half round pliers, so that when you sit the fluorite on top it sits nicely just under the girdle of the stone. From a birds-eye view you shouldn’t be able to see the wire around the stone at any point. Once you have your pear shape in wire, cut a small pallion of solder, and join the two ends to meet (making sure they go together nicely, you’ll have to file them so they create the tip point, also, I used hard solder throughout the entire process, with the exception being the bale).
Then start creating the claws for the prong setting. Do this by bending more 0.8mm wire into large “U” shapes, these will slot into your piece as shown above. It’s best to start with the two claws on the north and south of the pear shape. Solder your north and south points onto your main wire shape like seen above, ensuring that you leave enough room under the pear shape for the depth of your stone. Then after you’ve soldered those two points, you will need to saw a straight gap through the middle of the north south wire, this will allow you to slot another piece of wire into the gap, which will form the east and west claws. Once this new wire is in place, solder the wires where the two points cross, then follow by soldering the east and west points to your main pear shape.
Step 2

If you would like a six-claw basket setting, repeat the above process, cutting diagonally along your crossed wires and slotting the claws into the gap again. The setting should look something like this. Before starting the next step, ensure that all your points are soldered and that you haven’t accidentally unsoldered or moved any other claws of your prong setting.
Step 3

Following your design, start forming your channel settings around your basket setting, for my design I was using 1.5mm white sapphires, so I started forming my 0.8mm strips of silver into two sets of two rails, ensuring you leave enough space between them for your stones. I left around a 1mm gap between the two rails.
Step 4

Once you have the main shape of your rails, solder them together at the two ends. Here on the right rails I have squared off the top, and at the bottom I have filed the small curve into a point. Excuse the Blu-Tack holding it all together for the photo! The top part was squared off by filing a 90 degree groove out of the metal with my square needle file and bending it over.
Step 5

On the left rails I have pointed the top curve so that it curves nicely into the side of the basket setting, and the bottom curves round to almost meet the top rails. In my design the rails bend round to hug the basket setting, so I was sure to keep my eye on the contact areas and that there would be enough contact when I came to soldering the rails to my setting.

Like so. Bear in mind that you can alter the rails of your basket setting once you’ve soldered them together, so don’t worry if your rails aren’t the exact width apart, there’s room to adjust. Remember before you solder anything you should coat the area with flux/borax, this acts as a barrier for the oxides and helps the solder to flow.
Preparing your pendant setting for loose stones
In my design there weren’t going to be stones all the way through the channels, so I “capped” half of my right channel along the bottom. I did this with 0.5mm sheet, by filing down the bottom of the two rails so that I could place the 0.5mm sheet on top and it would be flush with the rest of the channel. I used my flat file to create the dip in the metal.

In channel settings like this, you need supports inside the rails for the stones to rest on, as well as the insides of the rails. So I soldered some 0.8mm pieces of wire just under 4mm apart from each other, so that the setter has somewhere to rest the stones. There would be two stones between each slice of wire. Once you have your wires in place, cut with your tin snips and file them down so they are flush with the rails.

Here you can see all of the channel supports in place and the capped part of the right side channel, At this point I then rounded off any sharp corners, buffed and roughly polished the piece, before carefully soldering the two rails onto the claws of the basket setting. I made it so that the right channel slotted into the left channel just underneath the basket setting. This was done by filing a groove into the underneath of the right rail, which was the same width as the left rail. Solder them together at this point.
Then all that’s left to do is solder the bale onto the back (I used easy solder for this, just in case I accidentally melted the piece so close to finishing!) Give the piece a final clean, buff with paper or buff sticks, and a high polish with your polishing mops, and send it off to the setters with your stones.
Et voila!
I hope this was a useful guide to how I made this necklace. Apologies that there aren’t more photos of the steps in-between! If you have any questions I’d love to hear from you and I hope I can help.
Looking to use the steps above to create your own basket setting? Pick up the metal wire and jewellery tools you’ll need online at Cooksongold.
Contact information
Facebook – Aimee L.B Jewellery
Email – aimeeLbooth@ymail.com
Twitter – ALB_Jewellery

Cooksongold