 This is a guest project designed by Tansy Wilson. Tansy is a professional jeweller and runs her business from beautiful rural Somerset. She also teaches a jewellery evening class at her local college. Tansy has a BA in 3-D Design and has been in the design industry for 20 years.
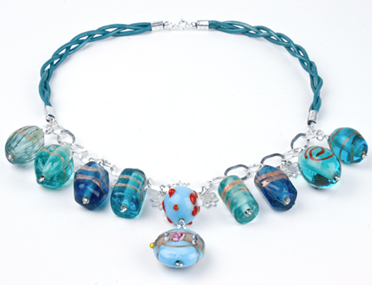
“In this design I have used Cookson’s coloured glass mix of beads in turquoise to make this fabulous statement necklace. This will be your ultimate must have piece of jewellery for the summer and can be worn with just your swimsuit or dressed up for the evening. I just love the beautiful blues of these glass beads and feel they totally sum up the colours of summer!”

You will need:
- 6 x 20cm lengths of turquoise round leather cord, 2mm
- 4 x silver end caps, 4.00mm
- 20 x 5mm heavy weight jump rings
- 1 x 6mm silver bolt ring
- 1 x packet of turquoise glass mix beads
- 20cm silver chain flat round and polished oval link, 10mm
- 8 x silver flower shape blanks 10.6mm
- 9 x 8cm headpins made from 0.8mm silver round wire
STEP 1
Cut six 20cm lengths of turquoise round leather cord. Holding just three of the lengths together, place them inside a 4mm silver end cap and using flat nose pliers, squash the end cap’s walls down tightly to secure all the ends firmly in place. Add a drop of super glue for extra security.
 STEP 2
Start plaiting the three leather cords nice and evenly and when you reach 12cm in length, take another 4mm end cap and trap these ends in place, cutting away any excess cord. Again add a drop of glue for extra security. Make sure your end caps have the eye loops facing out at both ends. Repeat step 1 and 2 for the other three lengths of cord.
 STEP 3
Attach one 5mm jumpring to the loop of the end cap at the top of one of the sections and close. Then add another jumpring to the loop of the end cap on the other plaited section. Before closing this jumpring, add a bolt ring clasp and then close.
 STEP 4
Take 20cm of silver chain, I have used Cookson’s flat round and polished oval link (10mm.) This means I have eleven large flat round links in the length. Attach one end of the chain to the loop at the bottom of the other end cap on the plaited cords by using a 5mm jumpring. Finally attach the other end of the chain to the other section with another 5mm jumpring so you now have a completed necklace shape.
 STEP 5
You now need to attach the glass beads to the chain and to do that you need to make headpins. The size of the holes in your beads, determines the thickness of wire used to make your head pins. These beads have quite large holes so I have used 0.8mm round Sterling silver wire. Hold a length of the sterling silver wire vertical under a steady flame from a gas torch so that just the tip of the wire is being heated. As it glows to cherry red it will suddenly melt onto itself creating a small ball of molten silver. As soon as this happens remove from the heat, cut to approx. 8cm and leave to cool.
 STEP 6
Repeat step 5 until you have made enough head pins to match the number of beads you are using. You may need to polish the end of your head pins to remove any fire-stain or discolouration. Place a headpin through a glass bead and make an eye loop as close to the top of the bead as possible. Spiral the remaining length of wire round the eye loop at the top of the bead to secure the loop and make a decorative feature.
 STEP 7
Repeat step 6 making a spiralled eye loop at the top of all your beads except for one smaller bead. This smaller bead will attach to your central feature bead. To do this you need to make an eye pin. Make an eye loop at the very end of 6cm of 0.8mm wire. Thread the smaller bead onto this length and then make another spiral eye loop at the top of this bead. Link this small bead onto your feature bead by the bottom eye loop and close.
 STEP 8
Attach your two feature beads onto the very central flat round link of your chain by using a 5mm jumpring.
 STEP 9
Move on to the next flat round link and add another 5mm jumpring linking this to the spiralled eye loop at the top of another glass bead. Repeat this process until all the glass beads are secured to the round links. Finally taking the small silver stamped flower shapes, add these to the polished oval links in between all the glass beads by also linking them to the chain using 5mm jumprings.
 STEP 10
You have completed the project. This is the finished Beautiful Blues necklace. You can get everything you need to design it by clicking here. Have fun making your own! You could also try…
Bracelet
When you buy a mix of beads and have chosen ones for the necklace you may have several left over. These can be used to make a matching bracelet. Plait another three lengths of leather cord together adding end caps at either end. A good size guide for a wrist length is between 7” and 8”. Then make more head pins as in step 5. Thread a head pin through a glass bead and onto one of the leather cords then spiral the wire round on itself, securing the bead into place. Continue adding beads and if you have any flower shapes left over add these as well using 5mm jumprings.

Designer Tip
Glass beads can be heavy when a lot are being used in one design. Sort out your beads so you can match similar sized ones to each other. Then when you are adding them to your chain they will balance evenly when being worn.
This project has also been featured in Making Jewellery Magazine.
You can see Tansy’s other project – Monochrome Magic – here. Have you tried it? What projects have you been doing lately to inspire others?

Cooksongold