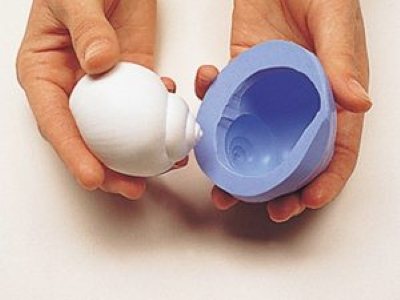
Do you frequently use polymer clay in your jewellery making? And find that you’re a little tired of the moulds you re-use time and time again? For a fresh take on your polymer clay pieces, consider learning how to make your own silicone moulds for polymer clay pieces at home. This will give you a way of producing new, unique polymer clay pieces, and help you add a new skill to your crafting repertoire.
Here’s our step by step guide to help you learn how to make moulds at home, and the materials and tools you’ll need to get it just right.
What you’ll need:
- Gedeo Siligum Molding Compound – this is a two-part silicone mix which can be used to accurately make your own silicone mould.
- Small object to mould – this can be any small object with which you would like to create a unique piece of jewellery. Some examples may include shells, keys, buttons, a small pocket watch, and any other small trinkets you have around the house.
How to make your own silicone mould step by step
Step 1: Measuring out the silicone compound
The Gedeo Silicone mould making compound is simple to use. All you have to do is take the two-part compound – one is white and one is blue. Take equal parts of each of the pastes. This can be done by eye however, for the best results use either weighing scales or measuring spoons for an equal 1:1 mix ratio.
Step 2: Mixing the silicone compound
Once you have equal quantities of each silicone paste, all you have to do to mix the two is knead them together, folding and mixing the two as you go. Mixing the two parts fully ensures that the compound will be both flexible and strong, leaving you with a long-lasting silicone mould that you can use again and again. Once the streaks of white and blue have disappeared and your silicone compound is fully mixed, you’re ready to apply the compound.
Step 3: Applying the skim coat
When you’re applying the compound to the object you have chosen, it’s important to start off with a small amount, especially if the object features a lot of detail. This is sometimes referred to as the skim coat, as you’re starting off with a small amount to skim the object’s surface.
The more nooks and crannies the object has, the more carefully you’ll need to apply the compound, pushing it into each corner of the object so that the imprint you get when making your silicone mould is as accurate as possible. Try pushing the compound into all the intricate parts of the object before you add more of your mixed compound to it. This will also prevent bubbles from forming in your mould, as you push out all of the air.
Step 4: Apply your second layer
Now you’ve applied the silicone compound to the more intricate parts of the object you’re duplicating, you can add the second layer to it. Continue applying the compound until you’ve used up your pre-made mixture. Tidy up the edges as you see fit. You may also want to ensure you leave enough of an edge around the object you’re working with so that you can easily hold the mould as you work with it at a later date.
Step 5: Now you wait!
Once you’re happy with the mould, all there is left to do is wait! Not for too long though, as the Gedeo Siligum moulding paste has a very quick drying time of 5 minutes. This means that you should have everything you require to make your mould ahead of time as the drying time really never exceeds 5 minutes. And if you’re working on very small pieces with small amounts of the compound, your drying time may be even shorter than that.
Step 6: Now peel back the mould
After 5 minutes, test the mould to check that it is completely set. Test the compound by lightly pressing your finger onto it. You’ll find that if the mould is not yet set, you will still leave a small imprint behind. If this is the case, wait a few more minutes and re-test the compound. Once the mould is fully set you should find that as you press your finger against it, the compound springs right back. Now you can peel back the mould. Don’t worry about breaking it. The compound is very flexible and durable, leaving you with a long-lasting silicone mould for use with polymer clay work.
Now you’ve mastered how to make silicone moulds, you can experiment with different objects, helping you to find new ways of creating unique pieces of polymer clay jewellery that suit your signature jewellery making style.
If you need to stock up on any mould-making materials, browse our jewellery crafting and modelling essentials – ideal for stocking up on all moulding and resin tools and equipment.

Cooksongold

