
Let it snow, with these beautiful silver pierced snowflakes. Inspired by traditional paper snowflakes but taken a step further, these will delight year after year and will become precious keepsakes.
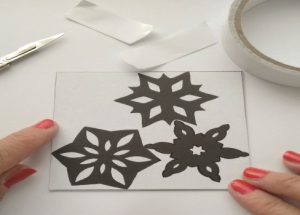
Step 1:
Set The Template.
Using your own design or a template, place the snowflakes onto a 9x9cm square of 0.8mm silver sheet. Double-sided tape is ideal, no need to remove the blue protective cover on the silver as it will make it easier to peel away the paper once you have finished piercing.
Step 2:
Indent The Silver.
Lay the silver on a metal block and mark out points on the snowflakes with a fine marker pen; a steel scriber is used to make indents in the silver, as this prevents the drill bit from sliding across the silver when using a hand-held drill.
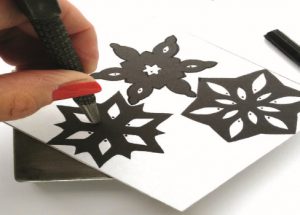
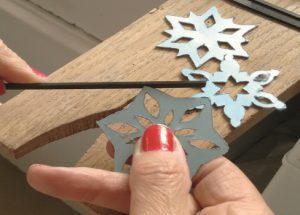
Step 3:
Drill The Pilot Holes.
Lay the sheet of silver on a wooden block and drill a pilot hole using a 1mm drill bit at each of the punched points.
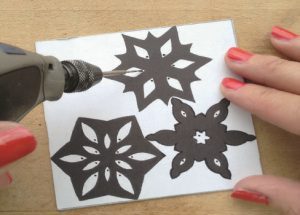
Step 4 & 5:
Cut The Snowflakes.
Use a 4/0 saw blade to pierce out the snowflakes. Use the edge of the paper as a guide, and then carefully pierce out the other two snowflakes.
For the more intricate internal sections of the snowflakes, pierce out using a finer saw blade such as an 8/0.
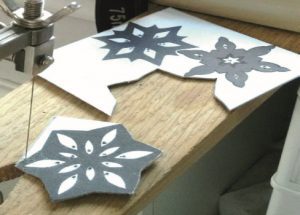
Step 6:
Smooth Off The Edges.
Use needle files to file away any rough saw marks and to tidy up the general shape of the snowflakes including the interior sections to create a crisp outline. For these small shapes, I found a square / triangle needle files particularly useful for this task.
File the outsides of the snowflakes at an angle and slightly round off the sharp edges which could otherwise be hazardous.
Step 7:
Remove Scratches.
Use emery papers starting from coarse through to fine to remove the scratches and create a high shine.

Step 8:
Finish.
Finish polishing the silver snowflakes by using polishing compounds and mop to create a mirror finish on the snowflakes. Keep each mop and compound separate from the other compounds, to prevent any cross-contamination.
Create a professional look to your snowflake set by stamping them with a 925 stamp and finish off by suspending from pale blue satin ribbon.
We hope you enjoyed learning how to make your very own snow flake baubles. If you have any questions or want to know more, get in touch with us on Facebook, Twitter and Instagram. We’d also love to see what you’ve been making so please share pictures of your creations with us too, tagging Cooksongold!

Jane Kharade