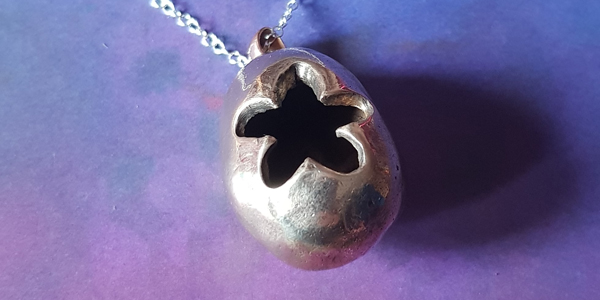
Make mixed copper and bronze Easter egg pendants using precious metal clay and wood clay. Hopefully it should inspire you to create different versions of these Easter eggs for yourself!
Step One
Start by making the one-off egg-shaped mould using Prometheus Wood Clay Powder. In a small bowl, mix one rounded teaspoon of wood clay powder with approximately three teaspoons of water, mix until a mouldable compound is formed, add a tiny bit more water or powder if necessary.
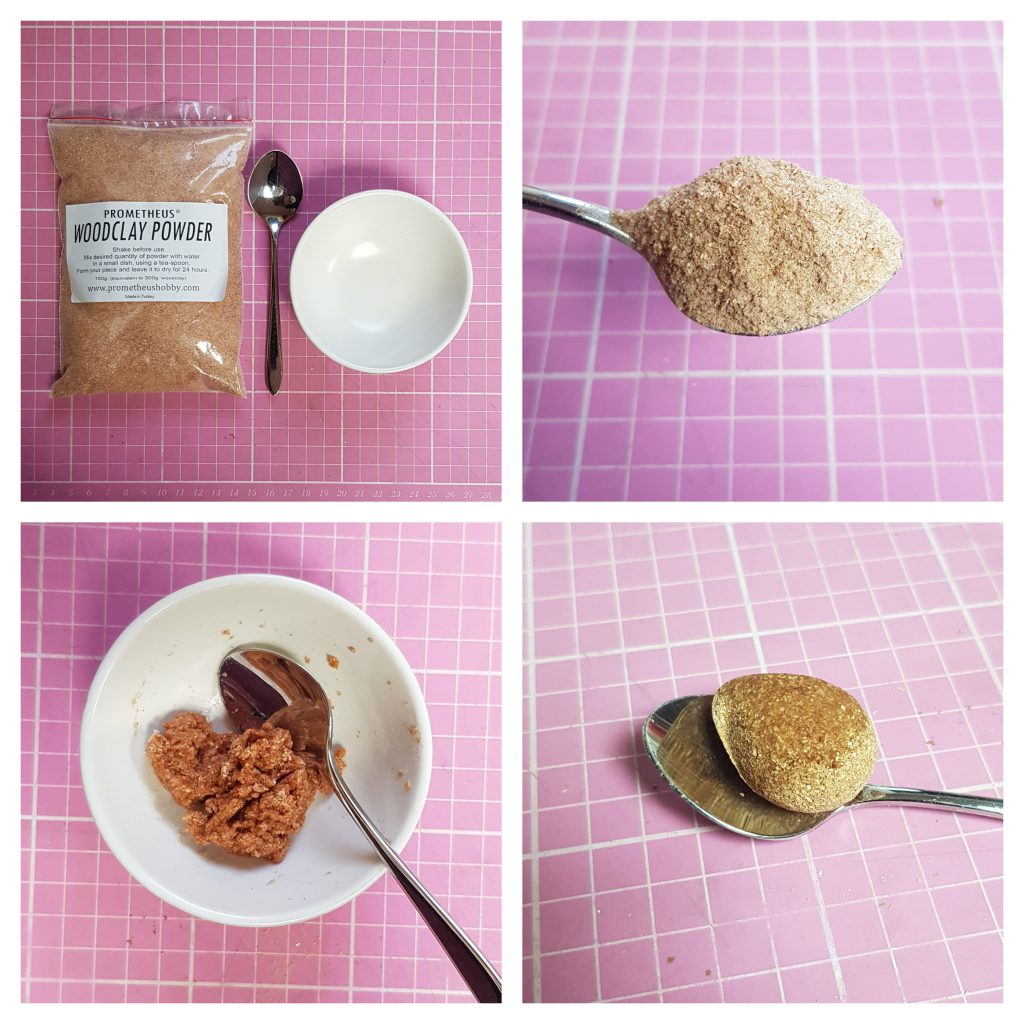
Mould your wood clay mixture into an egg shape using your hands. Leave the egg shape to dry for at least 24 hours. Rest the egg on a teaspoon to help keep the form and turn occasionally for even drying and shape. Once your wood clay egg is fully dry then it is ready to be used as the former for your Easter Egg
Step Two
Next, move on to preparing your precious metal clay. Select a similar amount as the size of your wood clay egg to start with. Squish it about to soften it up and make it smooth. A simple way to make your first precious metal egg is use one type of clay. You could challenge yourself and mix two metal clays together, which will create a pattern on the surface of your egg but make sure the two metals are joined thoroughly. If you’re only using one type of clay then I would advise either silver, bronze or copper as the main colour for your egg.
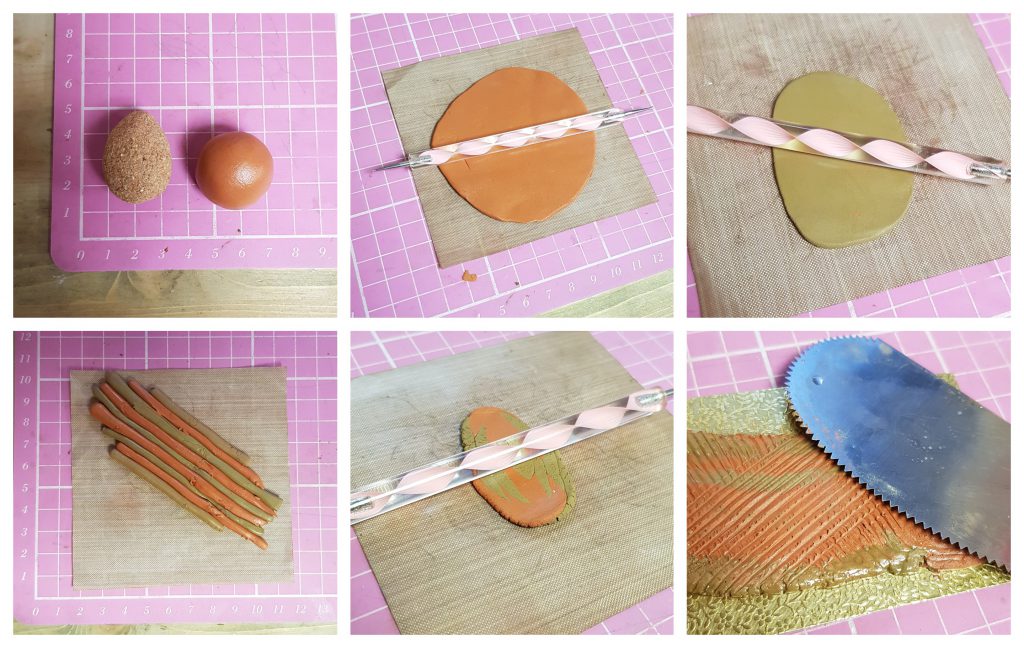
Roll out the clay on into a rough circle, use a non-stick sheet for rolling on, so the clay doesn’t stick to the surface and roll with a little acrylic rolling pin or similar. You could use rolling guides here, to make sure you don’t roll too thin, between 2mm and 3mm seems to work well. Once you have rolled out the clay put to one side and get your wood clay egg.
Step Three
Pop your now dry wood clay egg into a small bowl of water, just for a couple of seconds to dampen the surface, this will help the metal clay adhere to the surface, then place your damp egg onto your rolled out metal clay and gently wrap your egg in the clay, pinching together any edge and moving any excess to the top of the egg. Leaving enough clay to embed your bail into, remove any excess clay and smooth over your egg surface, making sure any joins are blended in well and your surface is ready for decoration.
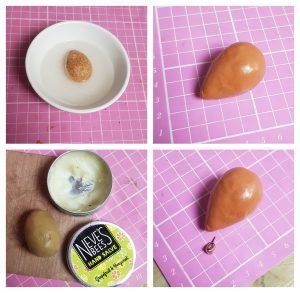
Tip: To stop your hands drying out the surface as you refine it, rub some beeswax-based hand salve onto your hands. Add an embeddable pendant bail, by pushing it into the clay at the top of your egg and squeezing the clay around the base of the bail. Once refined and your bail is added, rest on a teaspoon to help your egg keep its shape whilst you prepare the decoration.
Step Four
Your egg needs to have at least one hole in it, to stop it from exploding! The best way to do this, is to include cut outs or incised decoration, using little cutters or a knife (If you don’t want to add decoration then put a tiny pin hole through the surface to allow air to escape).
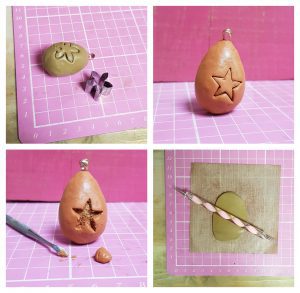
Prepare enough clay for your egg decoration by squishing it until it is soft and even in texture. Roll out your prepared ball of clay onto the textured brass surface or non-stick sheet if you aren’t adding extra texture.
Optional decoration would be to use a textured brass plate to add patterns to your clay embellishment. Prepare your textured brass plate by rubbing it with hand salve, this will help to stop the clay sticking to the brass surface when you roll your clay.
Step Five
Choose your cutter and cut out the shapes you want from the rolled-out clay on the textured surface. Use a serrated modelling tool, such as this metal kidney to roughen up or score the surface of your cut outs, this will help them grip to the surface you are attaching them too. Carefully remove any excess clay from around the cut-out shapes and squish this back together ready to reuse. Using a modelling tool, very carefully lift up the cut-out shapes from the textured surface, ready to apply to your egg.
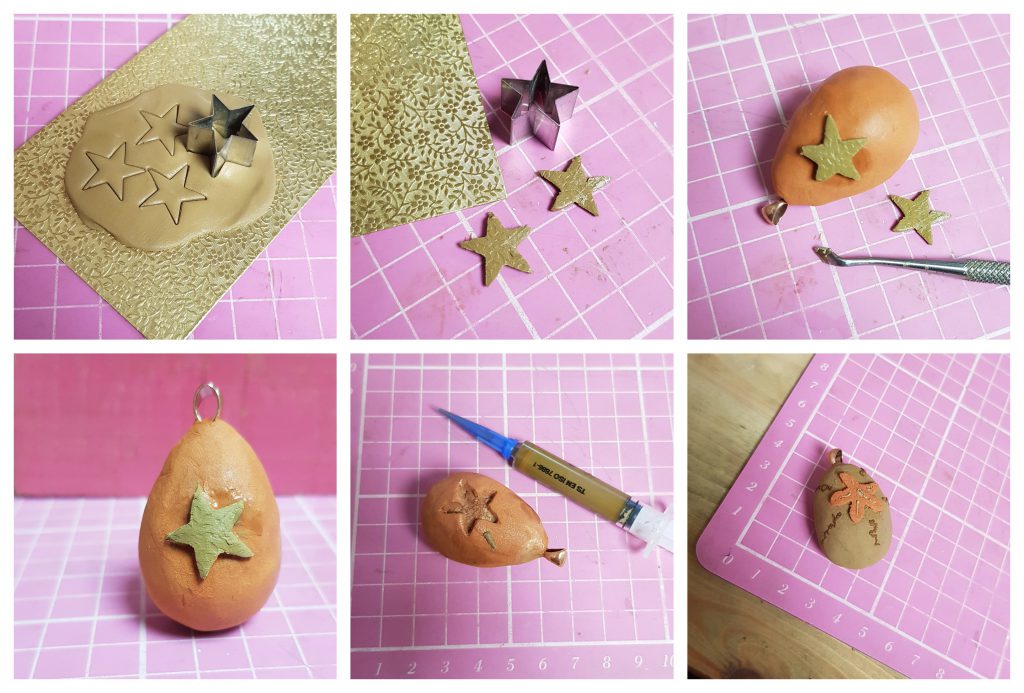
Roughen the surface slightly where you want to put your prepared shape and brush with water, carefully add your shape to the prepared surface of your egg. Use a fine tipped modelling tool and neaten the edges, this should also help your shape stay in place. Gently place on a teaspoon to dry, taking care not to squash your decoration.
An option at this stage would be to embellish with more patterns using clay from a syringe. I find leaving to dry naturally gives a better finish, however if you want it to dry faster, I find a mug warmer is great, or on top of my warm kiln
Step Six
When your egg sculpture is dry, you are ready to refine them. I use tiny diamond burrs on my Dremel pendant drill with a flexible shaft (remember to wear safety goggles). Firing your egg sculpture: You must kiln fire your egg, due to the wood clay former at the centre.

We would recommend using bronze or copper clay; firing may differ if different makes of metal clay are used. Remember to NOT torch fire a sculpture with wood clay in it
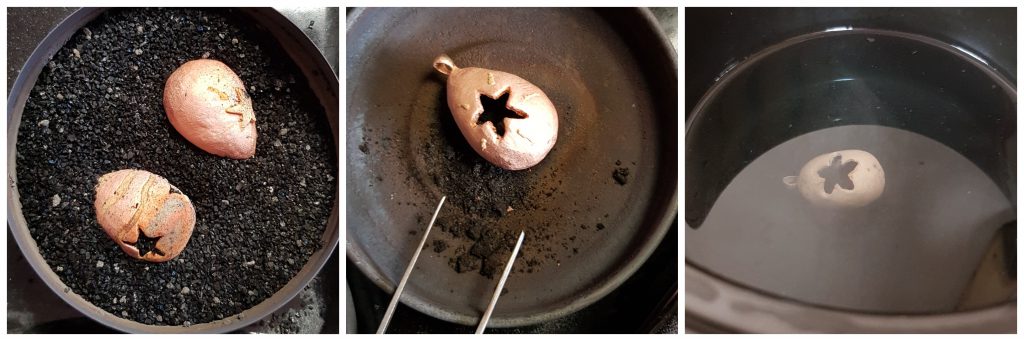
Step Seven
Place your refined egg sculpture on a kiln blanket for support, on top of a wire mesh ready for a two-part mixed metal carbon firing put all of this into your kiln, shut the door and fire on full power to 500 degrees and keep/soak at that temperature for 15 mins. Remember that the kiln setting for Prometheus Bronze combined with Prometheus Copper is the setting of the lower firing metal, with an increased soak of two hours.
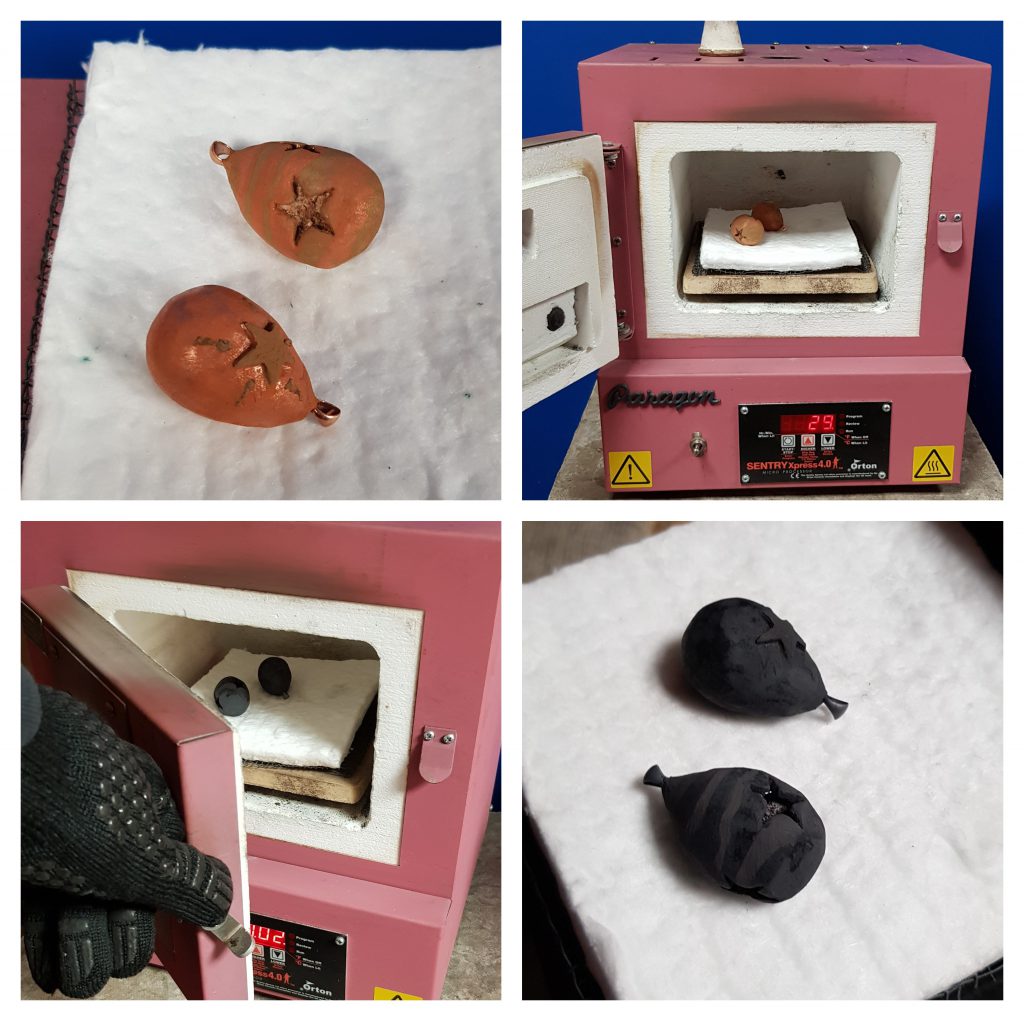
When the fifteen minutes has elapsed, using a metal spatula carefully remove the mesh and blanket with your egg sculpture on from your kiln and place on a heat proof surface (wear green safety goggles and heat proof gloves)
Step Eight
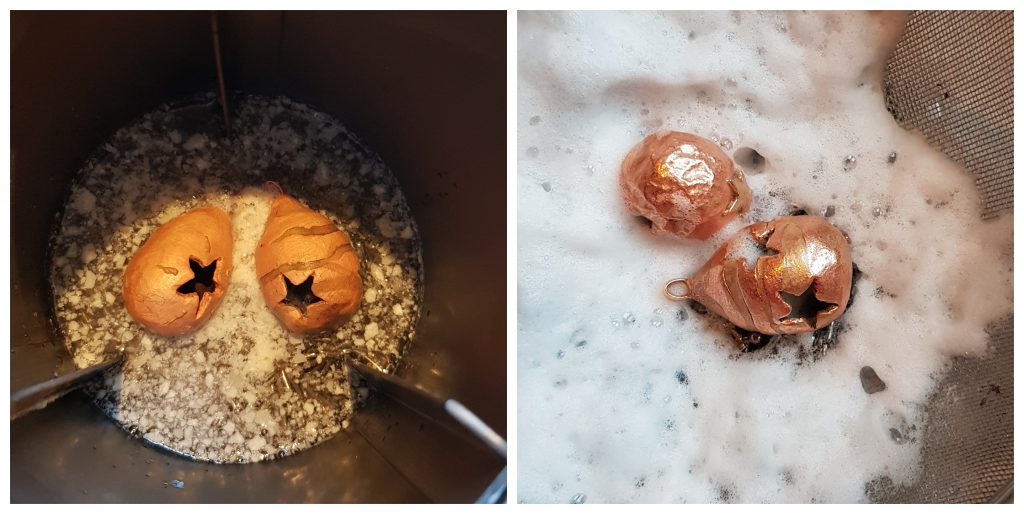
Take a carbon firing pan and place a layer of activated coconut carbon in the bottom of the pan (at least 1cm deep). Using kiln tongs or long metal tweezers, place your egg sculpture onto the layer of activated carbon. Cover the egg sculpture with more activated carbon, filling the firing pan to stop any oxygen getting to your sculpture.
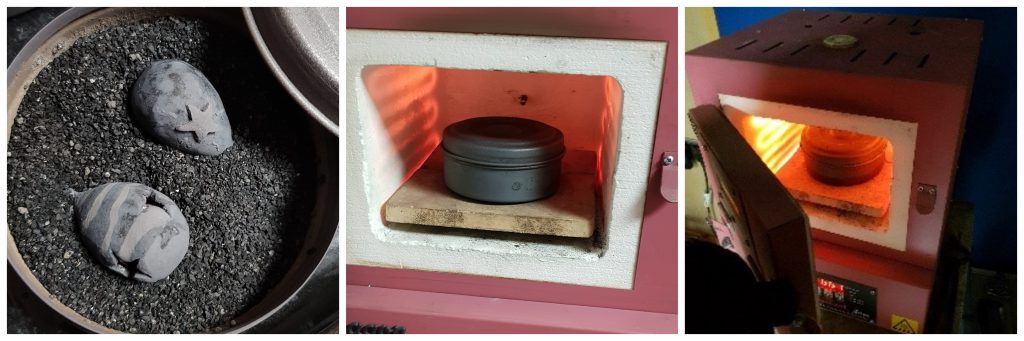
Place the lid tightly on the firing pan and carefully put back into your hot kiln (wear green safety goggles and heat proof gloves). Heat the kiln to 820 degrees (different kilns may vary slightly in temperature) and soak for 120 minutes for mixed Prometheus bronze and copper clay, then leave to cool.
Step Nine
Now prepare some picklean solution, I use a small slow cooker to keep it warm. Using heat proof gloves, remove the firing pan from your kiln, place on a heat proof surface and take the lid off, find your egg sculpture. You should remove as much as of the wood clay residue from the inside of your egg, I use metal tweezers to carefully poke out (discard this residue safely in a metal bin).
Brush any carbon dust off your sculptures with a brass brush and place into the picklean solution, I find about 30 minutes works well. Remove your egg sculpture with plastic tweezers and rinse with clean water. You could at this stage use an ultrasonic cleaner to clean all the carbon residue from your sculpture, if you have one.
Step Ten
Prepare your barrel polisher, I use a mix of 3 types of shot with a teaspoon of Barrelbrite and water just to the surface of the shot. The tumbling process work hardens your sculptures as well as cleaning them up. A good few hours (up to eight) works best for bronze and copper clay.
After a few hours, empty the contents of your tumbler into a sieve, under running water and rinse. There may have been residue from the wood clay trapped in your egg sculpture, if the Barrelbrite suds are grey, rinse your sculpture and the shot thoroughly, repeating this step until the contents come out clean, then remove your egg sculpture from the barrel polisher, rinse and dry
Step Eleven
Refine your sculpture further using fine needle files or diamond burrs on a Dremel drill. Then polish your egg to the finish that you want. I use my Dremel pendant drill with a flexible shaft and a variety of polishing discs and polish (remember to wear safety goggles and a mask) I use a felt pendant wheel, with Tripoli.
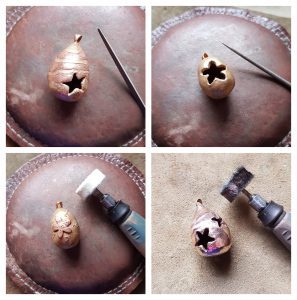
An optional finish is to gently apply a little heat from your torch to bring out the colours on the metals, do not quench afterwards, just let the piece cool naturally as you watch the colours develop
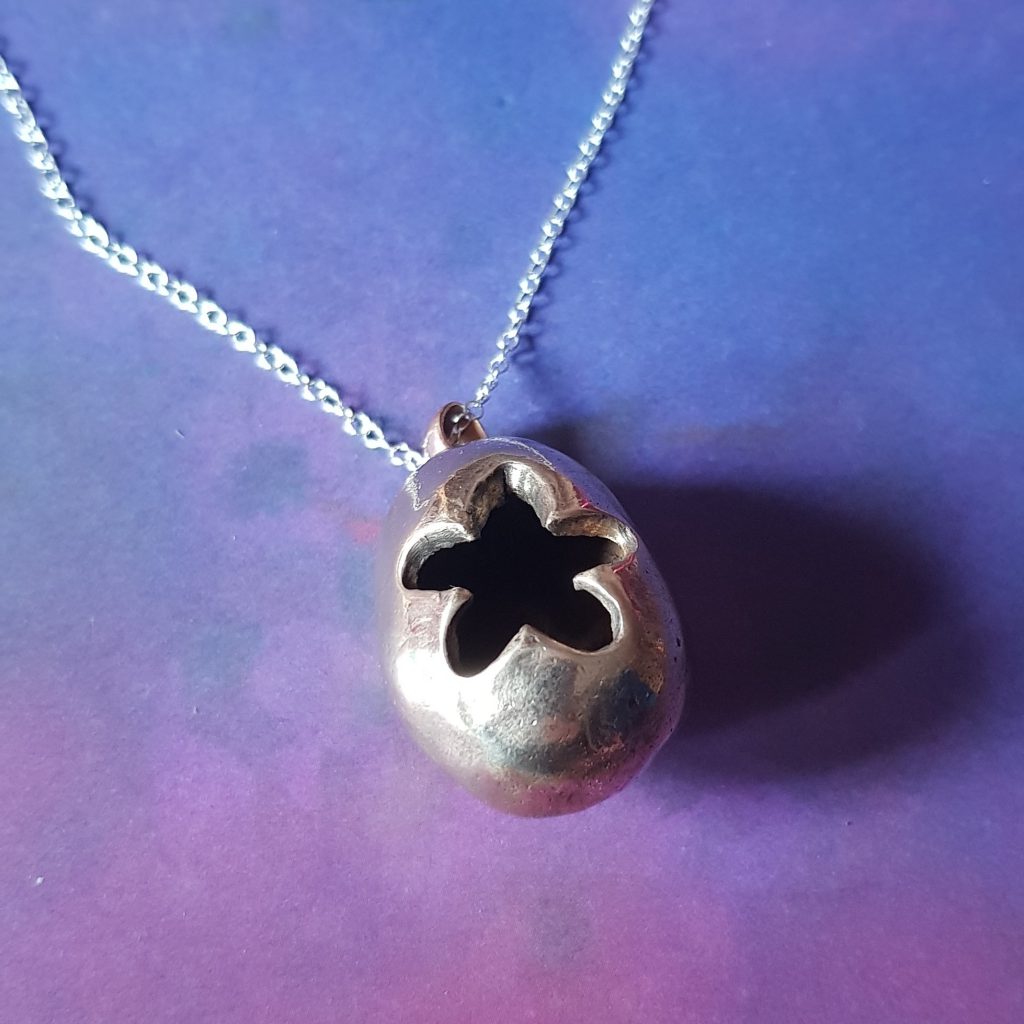
Step Twelve
Polish your egg sculpture with renaissance wax to encourage the metal to keep its shine. Thread a chain or cord through the pendant bail and you have your very own unique Easter egg, ready to wear
And you’re done!
Shop our range of precious metal clay or see our range of projects that use clay
CRZyBest
Silversmith & Sculptor. I'm Claire, I create tiny bespoke sculptures & turn them into jewellery, accessories & alternative bouquets.