This quick project is a great way to introduce yourself to key silversmithing techniques such as metal forming and finishing – and better still, you end up with a pretty pair of earrings in only half an hour! If you have extra time or want to challenge yourself to learn a new technique, read on to find out how you can adorn these earrings with pearls in just another 30 minutes!
Step One: Draw out the shape

Take your clean sheet of brass and, using a permanent marker, draw the outline for one of your earrings. Don’t worry about the ink being permanent, it will easily rub or sand off later on in your project! Drawing the shape close to the edge of the metal will help you save materials and make the cutting out easier.
Step Two: Cutting out the shape

It’s a good idea to cut roughly around your shape before you cut into the detail as it’ll help your shears get right into the corners of your shape. Once you’ve cut a rough square around the shape, begin slowly cutting into the shape itself, taking care not to catch yourself on any sharp points that may curl up as you cut.
Step Three: Flattening out the brass

Once you’ve cut out your first shape, you might need to straighten it by either hammering it lightly against an anvil with a soft mallet, or by taking it between to pliers and giving it a wiggle until it flattens out.
Step Four: Filing the shape

Now you can begin filing away the rough or uneven edges with your needly files. If you’re using the same shape as the one in this project, then a half-round file is a good option. Using upward strokes, file the shape at a slight angle to smooth away any harsh edges and improve the finish.
Safety tip: when filing, you should never point the file towards you or have the end of the file digging into your hand as this could cause an accident if your hand – or the piece – slips!
Step Five: Cutting out the other earring

Once you’re happy with your shape, you can now use it as a template for your second earring by drawing around it on the brass, then cutting and filing as before.
Step Six: Getting the ‘finish’

To clean up the file markings on your shapes, use a rough emery paper and buff the edges and any imperfections on the metal. Then, take a finer emery paper and further smooth the edges and imperfections away. To create a sandy, satin finish, buff the brass all over in circular motions using a fine grit emery paper.
Step Eight: Marking out the hinge

Your shape should have two points at its top edges. On the shorter of the two, mark out where you’d like to drill a hole for your ear wire to thread through. Then, taking a sharp point such as a soldering pick, make a little dent where the marking is – this will help guide the drill.
Step Nine: Drilling the hole

Holding the piece firmly with your fingertips on top of a wooden block or bench pin, gently drill a hole where you made the dent, keeping your fingertips well away from the drill. Repeat this for the other earring.
Step Ten: Form the loop for the ear wire

Now, taking your round-nose pliers, curl the longer point down towards the rest of the earring to make a little loop – this will secure your ear wire when you’re wearing the earrings. Repeat for the other earring.
Step Eleven: Forming the ear wire

If the plating on your headpins doesn’t colour match the brass of the earring, gently buff it away with fine grade emery paper. Then using your round-nose pliers again. Make a loop in the ear wire, then curve it round in a loose ‘n’ shape so that it can be threaded through the brass loop on the other side of the earring. Cut the excess wire and gently file it to remove any sharp points and make it go through the ear piercing comfortably.
Step Twelve: Attaching the ear wire

Give the ear wires a few gentle taps with a hammer or mallet against an anvil to work harden them. Using a pair of pliers, attach the loop of the ear wire to the drilled hole, so that the ear wire works like a hinge and can thread through the brass loop to close and secure the earring.
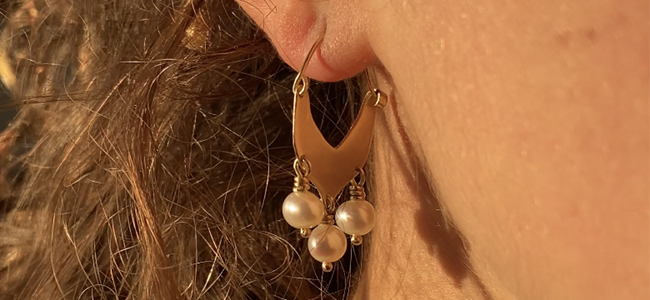
Enjoy!

Pop your earrings on, and congratulate yourself for making your own jewellery!
Additional Steps: If you have the time and want to challenge your skills as a jeweller, read on to see how you can add pearls to your design!

Drilling holes for the pearls
Mark out and drill three holes on each earring using the same method as before – spaced out along the bottom of the piece looks best.
Attaching the pearls
Thread the pearls each through a head pin, and then make a little loop in the excess wire above each pearl. Thread the loop through the drilled holes and begin wire wrapping the headpin to attach the pearl to the earring.
Wire wrapping the pearls
To do this, hold the loop in one hand using some bent nose pliers, and then, grasping the end of the wire with round nose pliers, wrap the end around the wire stem to secure the pearl to the piece. Snip off the excess wire and repeat for each pearl.

Why not try remaking these earrings in silver or copper, or experimenting by attaching different stones and beads? Make this design your own and use it to practice your new-found skills for all your future creations!

We want to see what you have been making! Share your creations with us on social media, tagging in Cooksongold on Facebook, Twitter and Instagram.
Elizabeth FJE Design
Elizabeth is a silversmith and student whose works are inspired by the ancient art and techniques of Classical Antiquity, which she studies as an undergrad. Her practice centres on unique ready-to-wear and bespoke pieces and looks to produce jewellery as sustainably and ethically as possible.