Soldering chain links is a fiddly business. But there are some techniques you can use to make sure that you’re getting it right each time. Use our step by step guide below to help you learn how to solder silver chain and gold chain using some basic principles.
Soldering chain links: What are you up against?
Whether a large part of your business is jewellery chain repair or you’re working towards producing your own chains from scratch, it’s useful to think about whether you have all the know-how and the tools you’ll need for a clean, professional finish. There’s a reason why a lot of jewellers don’t make their chain from scratch. Put simply, it’s a very tricky skill to get just right! So, if you can nail this technique you’ll be a sought-after metalsmith, able to produce a truly handmade product that is unique to you – always a great selling point for your customers.
Soldering chain links – where to start
- Make sure you’re familiar with the basic principles of soldering, especially sweat soldering. This is an advanced soldering technique so if you haven’t used solder before, get back to basics with a simple soldered ring or pair of earrings.
- First time soldering chain links? You may want to have a few practice runs before you work on your customers’ projects. This will help you find a good position to work in and a workbench set up that works for you.
- Ready to start? Take a long look at the chain you’ll be working on. How fine is it? How many chain links need to be closed? And do you have the right setup and tools to carry out the work? Read our list of must-have chain soldering tools and supplies below.
Which jewellery soldering tools do you need?
- Flux
- Soldering probe
- Jewellery soldering torch
- Soldering block
- Solder suitable for the alloy you’re working with
- Reverse action tweezers
How to solder chain links step by step
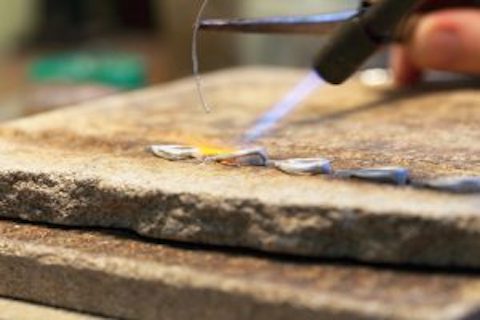
- Setup is vital. Due to the fiddly nature of chain soldering, make sure you’re happy with your setup as it can make a difference to how efficient your soldering technique is. You’ll need to rest your reverse action tweezers steadily on your soldering block. It’s best to do this so that you can precisely clamp one single chain link in place while the rest of the chain trails safely behind. That way, all the other links are away from the heat and you’re confident that your chain isn’t going anywhere during the chain soldering process.
- Use a thin black marker to mark chain link joins. This will help you more easily identify exactly where the solder will need to flow.
- Make sure all joins are flush. For the best solder joint possible in your chain links, take the time to make sure they’re completely flush and as tight as possible. Much like a jump ring, you can gently twist the two ends of the chain link together so that the join is almost invisible, even before soldering.
- Take your soldering probe. Apply flux to the end of your soldering probe and preheat the end of it with your soldering torch.
- Apply solder. Place a tiny soldering pallion on the end of your probe and start to heat it, until the solder flows. Then, immediately remove from the heat.
- Place the solder onto the chain link. Remember making those black marker marks earlier? That should help you easily identify where to place the solder. Gently touch the solder on this black mark.
- Heat again. But this time make sure that you apply the heat about 10mm further away from the solder. This will provide just enough heat for the solder to flow.
- Repeat as needed. Continue using this technique of so that you get the neatest solder join possible.
Soldering jewellery can be a tricky technique to get right, especially when you’re working at such a small scale. Now that you have a step by step guide on an old metalsmithing trick, soldering chain links should become easier and easier.
Stock up on all the soldering equipment and supplies you need at Cooksongold today. And if you’re perfecting your own chain-based designs, don’t forget to take a look at all of our loose chain, findings and clasps to produce high quality jewellery.

Cooksongold