
Whether you’re dreaming up delicate jewellery or piecing together bold metal designs, silver soldering is a game-changing skill every maker should have in their toolbox. It might sound technical, but once you get the hang of it, the creative possibilities are endless.
What is silver solder used for?
Silver soldering is all about permanently joining two pieces of metal using a filler (aka silver solder) and heat. It’s most often used in jewellery and silversmithing, but it works just as well with copper, brass, gold, and gilding metal.
Types of Silver Solder
There are four main types of silver solder, and each one melts at a different temperature:
| Solder Type | Melting Range |
| Hard | 745 – 780°C |
| Medium | 720 – 765°C |
| Easy | 705 – 725°C |
| Extra Easy | 655 – 710°C |
Start with hard solder for your first joins — it can handle more heat. Then move down the line to lower-temperature solders as you add more joins. This way, your earlier work won’t re-melt and fall apart.
How do I heat up metal for the soldering process?
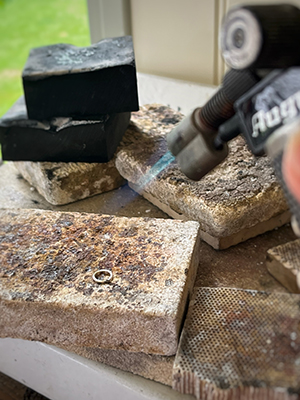
You’ll need a blowtorch. Torches vary from small, portable ones for tight spaces to larger setups connected to gas bottles. Either way, they work by mixing oxygen with gas (propane, butane, or natural gas) to produce that perfect hot flame.
Control the flame’s size and heat using the valves, and always keep safety first.
What is flux?
Flux is essentially a cleaning solution which is applied to a solder join prior to heating. Solder will not run without it, so it is an absolutely vital component of every soldering process. Flux comes in liquid (Auroflux) or paste form (borax dish and cone), and is applied with a small paintbrush.
Where can I do my soldering?
Soldering must be performed on a heat resistant surface which can withstand and absorb the intense heat. A small working area can be easily constructed using heat resistant sheets and bricks (asbestos substitute, magnesia, charcoal etc.), which are perfectly adequate for most small scale soldering jobs. Larger jobs should only be carried out in a purpose built soldering hearth, with adequate ventilation and full fire and safety precautions.
How do I clean metal after the soldering process?
After heating, your metal will look dirty but this is perfectly normal, just pop it into a pickle bath (a safe acidic solution like Picklean) to clean off oxides and bring back that bright shine. It can be used warm or cold. Just don’t drop steel in it unless you want everything to go pink.
The Soldering Process step by step
- Clean and de-grease the metal to be soldered using files and emery or wet and dry paper.
- Ensure the metal to be soldered fits together as closely as possible (you shouldn’t be able to see through the joint).
- Apply flux to the joint and heat gently to dry.
- Apply tiny pallions (pieces) of silver solder along the join. The solder should also be clean and grease free.
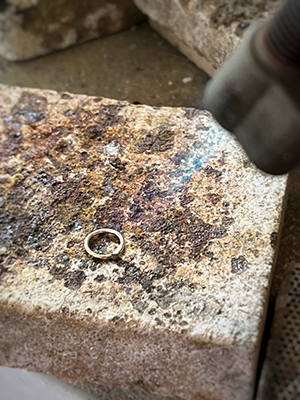
- Heat the metal evenly using a fine flame. Keep the flame moving and watch constantly as the metal starts to glow a dull red.
- As the metal reaches temperature, watch for a flash of silver which means your solder has run. As soon as this happens remove the blowtorch.
- Allow the piece to cool and place in a Pickling solution to clean.
NOTE: if the solder has not run or has not formed a successful bond, you will need to clean your item thoroughly before trying again following the steps above.
Once you have mastered the art of the basic silver soldering process and you are more familiar with the right tools for the job, you will be able to move onto more complex soldering projects.

Cooksongold