
- Forum
- Question Time
- Need help/ideas - no luck soldering 2mm wire through bottom of a copper dish
-
 Need help/ideas - no luck soldering 2mm wire through bottom of a copper dish
I've fabricated a shallow copper dish out of 22 g copper sheet, 51mm top diameter, 38mm bottom diameter, 26mm deep (the item will hang from a central wire).
Into the center of the base of this dish, I've drilled a hole to accept a 2mm copper wire. Upon inserting the wire, the fit is VERY tight and I can see no gaps when held up to the light.
I thoroughly clean all metal areas that are to be joined, flux well (borax), place my solder, open up my propane all the way, fire up my torch (Orca propane/air, largest tip for the most heat), begin bringing the piece up to temp...
So far, so good, right?
WRONG!
It takes WAY too long for the solder to flow...and when it DOES flow, it will NOT hold the wire in the hole...it's like there was never any solder there and slips right back out. I've tried silver solder (hard, med, easy) and copper-phos with the same results. As for the soldering surface, I've used Solderite, charcoal block, and a tripod/screen...seems to make no difference.
I suspect that the culprit is that it's taking so long for the metal to come up to temp (oxides forming at the join?), but I don't get WHY it's taking so long. I've used THIS torch successfully on larger pieces than this with no problems at all.
I'm at a loss here...what am I doing wrong?
Thanks,
Sherry
-
That is a mystery Sherry, the way you describe it, it should really work, if you are using solder strip and not paste.
Start again, by cleaning everything up to be free of powdery deposits and shiny around the hole. Use new shiny wire.
Turn the dish upside down on your block and push the wire right through until it pierces the block for support. Add flux and two or three pallions of hard or easy solder (medium is more troublesome to use).
You dont need concentrated heat, so wave your flame about until the dish heats up, then briefly linger on the join until the solder flows.
Overheating the wire will damage it, so work in a darkened area so you can see if it is getting too red.
When finished nip off the surplus inside.
Let us know how it went. Regards, Dennis.
-
The only other suggestion would be can you box it in with some firebricks to trap some of the heat?
-
Thanks for the replies Dennis and Peter...
The side seam on the piece I've SORELY abused trying to figure this out finally gave way last night after I posted this, so I took out my frustration on it with a hammer (it felt good, too!), woke up hubs in the process (he DIDN'T think it felt good!), and laid it to rest in my copper scrap bucket.
I've cut out a new piece and will give it another go tomorrow, but I "think" I've ID'd at least part of the problem...I haven't been opening the valve on the propane TANK enough (16oz "camp stove" type disposable tank). I played around this afternoon with some larger pieces of heavy gauge scrap (trying to get roughly the same "mass", so to speak) and found that after I opened the tank all the way, it took no time at all to bring the metal up to temp.
I can only assume it was dumb luck that I've successfully soldered larger pieces before...or the solder gods were smiling that day.
Will let you know how it goes.
Again, thanks for the help.
-
Finally got it!
Lessons learned...
a) give your torch enough gas (I had only cracked open the valve before...that's fine on small pieces, but not so much on larger ones...open it up)
b) when you fire up the torch, crank it up and work quickly
c) USE A FIRE COAT (only used boric/alcohol a couple of times before & thought it was overkill...NOT ANY MORE!)
d) Perlite from the garden center makes a great soldering surface (at least in this instance)...dug out an old pie tin, filled it up, and burrowed the upside-down cup into it, filling the cup...worked great!
e) if using phos-copper solder, don't use too much (it doesn't seem to be as "well-behaved" as silver solder...at all!)
I've ordered 6 magnesium blocks so I can fashion a heat "cave" of sorts when needed, so that should help going forward.
Again, thanks for the help and allowing me a place to talk it out.
Have a great weekend, everyone!
-
Well done, but beware: There are no gods of soldering, only demons and they are always lurking, ready to catch you out.
By the way, I quite like vermiculite boards and sheets, because you can stick pins into them and Keep parts in place for soldering. Regards, Dennis.
-
I was going to use fire bricks to create a heat trap but splashed out on a purpose built brazing hearth. It cost me about £50 off eBay (stovecareandrepair) and you just screw the pieces together. I use mainly when casting but the design really keeps the heat in and protects the surrounding areas.
-
Ah, could we have a link for that, or possibly a picture?
-
Brazing hearth
As requested.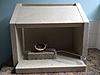

https://www.ebay.co.uk/itm/Brazing-H...-/271433881978
You could probably make one yourself but I dont know how much the board would cost and this is quite substantial.
-
Thank you, that should suit a lot of people. Dennis.
 Posting Permissions
- You may not post new threads
- You may not post replies
- You may not post attachments
- You may not edit your posts
-
Forum Rules


 Reply With Quote

Bookmarks