So I thought I'd start a new thread as I'm now not claw setting by hand, I'm claw setting with my beautiful new little foredom. It's awesome btw, sadly there's no accounting for its owner....
The setting looked the right size, so I started with a 4mm 90 degree hart burr and tried first to notch all the claws. I held my foredom like a pen (not like an axe - thanks Peter), but while notching a couple of the claws a bit, noticed that I was mainly just shaving a slope of metal off the others as the burr went in.
So seeing as how the claws were at least marked (sort of), I switched to a 2.5mm hart burr and tried to cut each one individually. Three times the burr got away from me cutting a scratch around the outside of the claw (glad I started in silver) but the grove wasn't deep so I carried on.
Seats:
Oh and to start with I was just holding the stud in my fingers to work on it, I felt like I needed to feel what I was doing initially.... maybe that was a mistake tho I don't know.
So it turned out the groves I'd cut were then a bit big for the stone, it didn't snap in, so much as waggle around. So I pulled the claws in slightly from the base and tried again. Still no snap but the stone went in less waggley. Used skinny chain nose pliers then to pull the claws over, the claws actually curved slightly which I wasn't expecting to happen, but the stone is in.
One pair of claws certainly looks better than the other pair, where there's a gap under the stone.
I also haven't attempted to shape the claw tops yet or polished, just looking for feedback after this first one, on how to get better!
I am certainly no expert on stone setting but the course I did taught us that the stone needs to sit as low as possible.
So first off gently open the claws so the base of the stone can sit right down into the setting, whilst it is there you can then mark off the height you need to cut your grooves in the claws.
I also very gently cut a seat in the base so that it sits down better.
Then comes the fiddly bit of making sure you get your cuts all lined up at the right height so the stone sits level.....
First one I ever did was before I did the course and luckily for me it was a diamond so I actually got away with plonking it in and letting it cut its own grooves LOL
There is serious scope for disagreement here, because although you might tailor the speed of your motor to the optimum for each burr, they will be inclined to snatch and wander. This will cause collateral damage unless you are strong enough to resist. Most of us re not.
For this reason I have always discouraged the pen grip for this kind of handpiece and suggested it be held in the fist like a potato peeler, resting the thumb somewhere firm to steady the hand.
This might be counter intuitive and takes a bit of learning, but will greatly reduce accidents.
Of course if you are lucky enough to have an ultra high speed set up with a turbine handpiece, then that can be used exactly like a pen. It takes tungsten carbide or diamond, friction grip burrs under a water spray and will cut most materials like butter. Dennis.
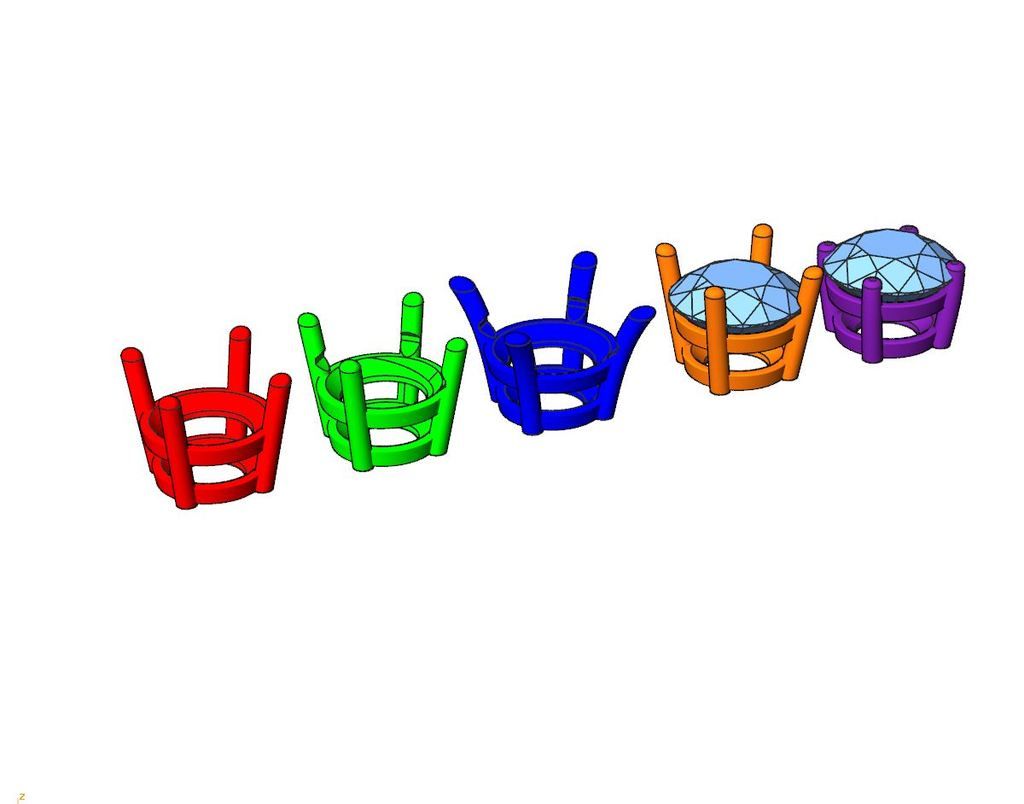
Looks good,I agree conventionally the stone should be set lower I have done a graphic of the progression I use. I tend to use a heart burr around 10% - 20% smaller than the stone to cut the claw to fit the stone. that way you can cut a bit out at a time to fit nicely you have done very well though it takes a lot of practice to get it down well.The claws will need to be cut down usually finished to around halfway between the table and the top of the girdle
Yes you will almost always need to cut the top of the claws off, if there is a lot of length I generally do it with the piercing saw without the stone in after marking where- be careful not to remove too much though!
If you are careful you should then be able to finish them with a round cup burr once the stone is in- being careful not to scratch softer stones.
I must admit I was surprised how much work was involved when setting ready made claw settings but as each stone is a different shape its unavoidable.
I hold my handpiece as Dennis describes too, rightly or wrongly


 Reply With Quote


Bookmarks