Page 1 of 2 12 LastLast
Results 1 to 10 of 13

Thread: Oval Cabochon thick setting and oval back help

  1. #1
    Join Date
    Apr 2016
    Posts
    158

    Default Oval Cabochon thick setting and oval back help

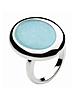
    Do you know how this is made? I'd really like to expand my bezel setting techniques, and I think this ring would be a great exercise.
    2 problems i can see. How do i create the domed oval back? Normally i set my stones on a flat back, but i love the idea of it being domed on both sides.

    My other question is, how do they create such a thick bezel that doesn't distort? Now i have some free time for a few weeks, I really want to give this a go.
    Any help or guidance would be greatly appreciated.

    Do i have to buy an oval doming block and punches? Sounds very expensive to me.
    Over to the experts :0)


    Click image for larger version. 

Name:	29b8c59f2eea175424950e4e10c13249.jpg 
Views:	45 
Size:	6.7 KB 
ID:	9664

  2. #2
    Join Date
    Dec 2009
    Location
    Central London
    Posts
    8,851

    Default

    Experiment with copper first Susie.

    First make the bezel cup with a normal base and cut away most of the centre, so that there is just a rim to bear the stone.

    The thickness of the bezel will be limited by your ability to bend it and whether you are setting by hand, or by hammer handpiece.

    Then aim to make a large round dome, which can be slowly squeezed in a vice until it is the shape you want, but bigger. Solder your bezel cup into it and trim away the surplus. Dennis

  3. #3
    Join Date
    Apr 2016
    Posts
    158

    Default

    Oh my god. I would have never have thought to do it this way. The squeezing sounds tricky to get it the right shape. Any tips? Glad to see someone else is up late Dennis!

  4. #4
    Join Date
    Mar 2011
    Location
    Manchester UK
    Posts
    942

    Default

    Its possibly set from the back the bezel is made then the stone is placed from behind then a back is lasered in place

  5. #5
    Join Date
    Dec 2009
    Location
    Central London
    Posts
    8,851

    Default

    Quote Originally Posted by Susie View Post
    Oh my god. I would have never have thought to do it this way. The squeezing sounds tricky to get it the right shape. Any tips? Glad to see someone else is up late Dennis!
    Not too bad, because you can practice with copper and open it a little again with the sise punch you used, or one of the others. Dennis.

  6. #6
    Join Date
    Dec 2009
    Location
    Central London
    Posts
    8,851

    Default

    Quote Originally Posted by josef1 View Post
    Its possibly set from the back the bezel is made then the stone is placed from behind then a back is lasered in place
    Yes you can, but for a more challenging low tech solution, you can also set from the back by using an outer bezel which is rubbed over underneath. Dennis.
    Last edited by Dennis; 14-12-2016 at 01:49 AM.

  7. #7
    Join Date
    Dec 2009
    Location
    Central London
    Posts
    8,851

    Default

    Josef's comment has nudged me into thinking up this method of getting the Easter egg shape:

    First make a shallow oval bezel cup to hold the stone, but not set it.
    Solder it into the lower oval dome.
    Add an upper oval dome as a cover, with a hole to expose the stone and trap it in place. Give it a vertical surround which overlaps the lower dome (made of soft thin bezel strip, say 0.3mm x1.5 mm fine silver).

    This outer bezel can then be rubbed over the lower dome to cold connect them. You might have to make a number of V shaped cuts to allow this, but done neatly they could end up almost invisible. Dennis

  8. #8
    Join Date
    Aug 2010
    Location
    England
    Posts
    1,902

    Default

    Susie, I am a bit confused as to what you want to achieve, you say that you want a domed back to the setting, is this correct or do you mean a curved back that fits the finger?

    Like this one; Click image for larger version. 

Name:	24 Blue lace agate ring.jpg 
Views:	28 
Size:	19.4 KB 
ID:	9665

    James
    Last edited by Goldsmith; 14-12-2016 at 10:52 AM.

  9. #9
    Join Date
    Apr 2016
    Posts
    158

    Default

    Hi James. It's a domed back to the setting, which is soldered onto some round wire.
    I can't find a picture of a side view, but looking on it sideways, it looks like an egg shape, soldered onto the round band.
    I just didn't know how to make an oval dome, and then how to set a cabochon stone into it.
    Thanks Jame

  10. #10
    Join Date
    Aug 2010
    Location
    England
    Posts
    1,902

    Default

    Quote Originally Posted by Susie View Post
    Hi James. It's a domed back to the setting, which is soldered onto some round wire.
    I can't find a picture of a side view, but looking on it sideways, it looks like an egg shape, soldered onto the round band.
    I just didn't know how to make an oval dome, and then how to set a cabochon stone into it.
    Thanks Jame
    Susie, I would pierce an oval larger than required, then shape it by hammering it on a lead block or a piece of soft wood with a domed hammer, then when it is a suitable dome I would use a mallet and gently level the domed oval's edge on a steel block, then I would solder the bezel wire centrally inside the oval's dome before piercing off the excess edge of the domed oval, then solder this to the ring band before rough polishing and then setting the cabochon before the final polish. I hope this makes sense.

    James

Tags for this Thread

Bookmarks

Posting Permissions

  • You may not post new threads
  • You may not post replies
  • You may not post attachments
  • You may not edit your posts
  •