
A commission I'm working on for my wonderful aunt, who's ordered it as a 60th gift for her sister, hence the 6 separate pieces - one for each decade.
Made from pine cone and crushed oyster shell cast in urethane resin, coloured burgundy.


 Senior Member
A commission I'm working on for my wonderful aunt, who's ordered it as a 60th gift for her sister, hence the 6 separate pieces - one for each decade.
Made from pine cone and crushed oyster shell cast in urethane resin, coloured burgundy.
Senior Member
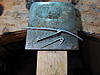
0.8mm sterling wire, slightly flattened then shaped - this should solder onto the silver base, then I can 'artistically adjust' the loop shapes to hold the cabochons - there's 3 more flattened and looped wire pieces to sit in the middle to hold the other sides of the cabs too but haven't taken pics of those yet.
Brooch pin is made from 1.5mm sterling wire, hammered into a pin shape before torsioning/twisting to further harden it, then slightly fettled with sandpaper to remove any roughness.
Now it just needs soldering... the bit I'm most scared of here because that wire is gonna be tough to do without it all going to sh*t in the blink of an eye!
So far everything's been soldered in hard grade, so the wire I'll do next in medium, then attach the pin mount using easy grade and hope everything stays where I put it...
I may do this tonight, if not tomorrow if I have the time - wish me luck please I'm cr*pping ('scuse) myself as I've quite a few hours sunk into this already!
Cheers, hope everyone is well! ',;~}~
Shaun/FloWolF
Senior Member
Gentle heating and it'll all go swimmingly. Pins don't have to be silver btw.
Senior Member
Thanks I'll do my best - I've ruined a few pieces during soldering because I get nervous, then I get distracted, and I blink and then it's silver puddle time...Originally Posted by metalsmith

As for the pin yes I'm aware they don't need to be silver and that a lot of people use stainless because of how silver is difficult to harden sufficiently, but that's why I wanted to do it in silver! I figured if it didn't work then I'd do another in stainless quickly enough. As it is the pin works perfectly after the hammer and twist treatment, and I don't believe it's too thick after hammering it into a gradual taper - at the thickest it's about 1.25mm I think.
Thanks again,
Shaun/FloWolF
Senior Member
Its cliff hanger. I'm waiting to see the finished piece.
I would mention here Shaun, that heavy pins leave permanent holes in clothing (unless it is thick knitwear) so not always appreciated.
The thickest pin I would use here is about 0.8mm.
I would also probably solder on the brooch fitting next, and the retentive loops last, because they are the most likely to give trouble if re- heated. Dennis.
Last edited by Dennis; 05-11-2015 at 11:22 PM.
Senior Member
This was my thinking initially too Dennis, but I tend to struggle with the easy solder flowing right on more delicate joints, but not so with larger areas like the pin mount, added to this it's easier for me to arrange it flat for soldering the wire 'retainer' on before the pin mount is in place on the back, and I was suddenly less sure if that was the best order after all, and I considered I could use wetted tissue or sand, or even the heat resist paste I bought from Cookson's to help protect the wire, and do the mount last instead. So even weighing your reply in, I still haven't arrived at a conclusion unless you've anything further to add?
As for the pin thickness I'd read your own advice in previous threads, and I've had pin damaged clothing myself so I do understand the point (scuse the pun!) fully. I'll measure this pin tomorrow as the 1.25mm was just a guess, but the thickest part of the length can't be much more than 1mm, with the majority tapering to well under that.
Thanks for looking in Dennis your experience is always appreciated.
G'night,
Shaun/FloWolF
Last edited by FloWolF; 05-11-2015 at 11:44 PM.
Senior Member
Thanks for posting this, Shaun - great pics and story in the creation of this piece - looking forward to the next instalment! The cabs look positively edible, like something in the shop window in "Chocolat".
Alan
Senior Member
Thanks Alan - I love making these composite materials. ',;~}~
Looks like I'm heading to the workshop a little later this morning, after cup of tea, meditation and breakfast - hopefully it'll go smoothly if I stay calm and alert; stay aware of the possible/likely difficulties and just take it... steady... <gulp!>
Cheers!
Shaun/FloWolF ',;~}~
Senior Member
Hi Shaun. In reply to your points raised:
If you have the funds to buy a 250g container of Easy-flo flux powder and use it mixed quite thinly (looking like skimmed milk), it will turn your life around, because easy solder will flow beautifully.
When you increase the weight of a piece by soldering bits onto it, you also increase the weight and therefore the heat required to bring it to soldering temperature for next time. Therefore by leaving the lightest piece until last you will require much more heat at that stage and loose some of the benefit of easier solder.
Lastly, once the pin fitting is soldered on, the piece can rest on it for the next stage , but slightly elevated. This will allow you to heat partially from underneath, but it will remain secure from the weight resting on it. Dennis
 Senior Member
lovely project - the resin pieces look great - I really like seeing people's process pics, thanks!
 Posting Permissions

 Reply With Quote
Bookmarks