-
 My first stone-setting
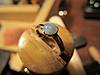
This is my first ever attempt at setting a stone: a sterling ring, size K, set with a 6mm banded agate.
I've cheated a bit because the bezel cup is a pre-made one that I just soldered on; I didn't try making it myself from bezel wire because the stone seemed very small. I'm going to get some bigger cabochons before I attempt making my own bezel.
Could I ask, have I got the height of the walls of the bezel right relative to the height of the stone? The stone's height is 2.75mm. I filed the bezel cup walls down to a height of 1mm from an initial 1.8mm approx. Next time I might thin down the rim of the cup a bit more to give a neater transition on to the stone.


-
Hi Aurarius,
Given the profile of the cabochon you have set, it looks like you have covered enough of the stone to secure it, there are much more experienced folk on here than me, who will be able to give their help!!
Tabby x
-
It looks nice to me. That's a very neat looking rub-over setting, my first ever setting was a right old squashed up mess. You should be proud, looks great =D
Sian Williamson
-
Thanks a lot Tabby and Keia.
I used an improvised bezel rocker made of bone for rubbing over the edges of the cup. It worked quite well, and the other end of the tool, which tapers to a point, served as a burnisher. I did finish off with a silicone rubber polishing tip though. I used linen thread with a bit of rouge on to polish round the underside of the bezel.
Mark.
-
You certainly did a workman-like job and it would not look out of place in a jeweller's window. If you felt so inclined, you could have lowered the rim by a tiny fraction more. or made the stone less shallow by putting a thin jump ring underneath.
Doing this allows you to experiment with the height of the stone, because the jump ring can remain unsoldered and just laid in. It can then be taken out and gradually reduced by rubbing on flat sandpaper until you get the result you want. In this case perhaps 0.25mm would make a difference.
To help get the stone out before you are ready to set it, lay a length of dental floss across the bezel cup first. Then you can yank on the ends.
You would also find it useful to have some 6"electronic callipers, to get a better idea of the measurements involved. Dennis.
-
Looks just fine to me. well done.
Best not to thin the rim too much.
-
Many thanks for the tips and positive feedback, Dennis and Chris.
My other half liked it, so that was a bonus.
-
I think it looks great - very neat. About a billion times better than my first attempt!
-
-
Many thanks indeed, Lydia and Lauren.
 Posting Permissions
- You may not post new threads
- You may not post replies
- You may not post attachments
- You may not edit your posts
-
Forum Rules


 Reply With Quote


Bookmarks