-
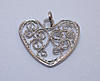
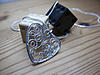
 Filigree heart pendant
Hello everyone!
I thought this was a more fitting place to ask for feedback and tips than the November competition thread, so I will post it here as well.
I just finished my first ever silver jewelry, a sterling filigree heart 25x25 mm.
The frame was made using 1 mm round wire flattened using a pasta roller. All filigree wire was drawn down from 1 mm wire and three strands were twisted and flattened.
After that I drew a nice pattern and as all plans they did not survive the first contact with the enemy. 
Basically the shape did not really turn out the way I drew it, so I went a bit of free-form instead.
Next time I will wind the filigree wire a bit tighter, I did have some places it wanted to split a bit.
Then I went on to soldering. I chipped some hard solder from my soldering strip and got to work.
The frame did not pose much of a problem (but next time I will just make a heart shape and not try to incorporate a loop into it).
I tried to solder with my micro-torch but it took forever to heat the piece up and my solder mostly partially melted.
So I got a bigger torch.
That surely did the trick, instead of a minute of heating it took just a few seconds to heat and solder.
I kept soldering and adding scrolls to it until I was ready and checked all the seams to make sure everything was soldered.
Then I made a jump ring (to be able to use it in a necklace) and soldered that as well (this time using my micro-torch).
Then on to cleaning and polishing. I used a couple of silicone wheels to clean up my solder remains and 3m radial bristles to smooth it out and polish it.
It might have been a bit complicated for a starter project, but I like challenges.
Most time consuming was soldering, it took some time before I admitted failure with the micro-torch and got a new one.
I guess I could have used an easier solder, but I thought that it would be best to learn using the real stuff.
All in all I spent about 20 hours making it, but for a first time with a lot of mistakes and research it wasn't too bad.
Next time I will try to make a tighter filigree wire, and perhaps make it a bit thinner as well.
I also plan to make it in fine silver and reflections to spot the differences between the materials.
If you have any comments, tips or questions, please do post. 
/Andreas
-
Hi and welcome to the forum Andreas
I can only say that it looks fine to me, but I am not into filigree, so cannot offer more than a customer point of view.
I have seen that there are a LOT of you tube videos on filigree from starter to advanced.
Keep going, I am sure it will become second nature in no time.
Last edited by Wallace; 28-11-2013 at 02:09 PM.
-
doing filigree would drive me nuts, so well done on getting a nice result. It kind of reminds me of a lot of the Scandinavian jewellery like Marius Hammer etc.
-
I think it is a fine first effort and as you have already said, the wires could have been flattened more. I think ideally the final strip should be 0.25-0.30 mm thick. In my link below, you will see my first effort in a pearl ring, using only one strand, but I am struggling to advance my skills at the moment and filling my scrap pot.
One comment is that all loose ends should be soldered, or they will begin to protrude in use. Please stay on as I could discuss this ad infinitum. Welcome to the forum, Dennis.
Last edited by Dennis; 28-11-2013 at 05:00 PM.
Reason: decimal point
-
Not having tried filigree myself I can only add that for a first attempt it's well done you! Any truly first attemp that ends up even resembling what you had hoped it would be like is a positive. Hi from me too
-
Thank you all and hi to those I haven't written to before.
I think I soldered most of it, better check the ends. Since it was made up out of loose wire I thought it best to add solder to the piece to make sure it didn't come apart. That would also help to fixate it so the scrolls doesn't unravel. That was another reason I chose hard solder, since I had to use a lot of it on the piece.
I will try to do a fine silver with just brazing as well, that ought to be interesting.
When twisting the wire I also found out that it was quite hard to maintain the grip of the piece (I tried both pincers and round-nosed pliers) when twisting, so I guess I will need to come up with something else. I will probably end up sawing a jack in a screwdriver, file or something to help hold it instead of having to keep my grasp of a pair of pliers while trying to form the wire.
Also, a pasta roller isn't the best for flattening the wire, I do wish I had the funds for a real rolling mill, but as a hobby it is quite expensive. Will probably roll it some in the pasta roller and continue flattening it with a hammer.
/Andreas
-
Andreas, this is the link to a piece I posted in July, which also has two separate links in it to ethnic filigree makers. If you have not seen them before are quite interesting.
http://www.cooksongold.com/forum/showthread.php?t=5166
As far as twisting the three wires goes, one end can be gripped in a vice, or tied to some other fixed point. The other end can be clamped in the jaws of an ordinary hand drill. The wire needs to be annealed to twist evenly as you probably know.
My comment about the ends of the wires in your design was that they should actually be attached to somewhere and not be free. Traditional filigree makers have their own secret alloys and I think they must be quite soft, to coax them into shape after coiling, as seen in the videos.
Lastly you will note that to finish the piece they take them to the nearest stream, or fish pond and give them a scrub with a wire brush. I finished mine with a wet jewellers brass brush an hand soap which gave a brilliant shine. A brass brush as used for cleaning suede shoes would do it too. Dennis.
-
Yes, I watched those videos, they were very helpful.
I meant not twisting the filigree wire, but more of twisting the scrolls. I frequently slipped when turning my tweezers and had to relocate it to the right spot again.
There is a lot of filigree styles I guess, I kind of wanted something "easy" for my first try. I have seen both open and closed twirls and scrolls. It makes sense to close them though, but I think my wire had been a tad thick for it.
I did a bit of mailing with the German guy in one of the videos in your link and he said it was a lot easier with fine silver since it is more malleable.
Also, fine silver brazed together will have a nice shine to it already and just needs to be cleaned a bit.
Will try the soap and brass brush the next time! I found the radial discs good, but it was quite tedious. I did have some cleaning up to do after my failed attempts of soldering though.
I built a device like in this video: http://www.youtube.com/watch?v=bORG7liBL58
It made a lot of sense that you should relieve the tension of the wire so it doesn't spring open when you let it go afterwards.
Next time I will twist it with the device, anneal it and then twist it a bit more manually to make sure all of it get twisted to the maximum without breaking.
/Andreas
-
I have just watched that video, but actually the hand drill as shown here http://www.toolstation.com/shop/p202...FY_MtAod0FYAeA will twist the wires just as evenly, provided they are annealed first, and you keep a tension until they are all done.
As for twisting coils from strips, you will note that they use strong tweezers, made by filing standard ones to be short and thick. See Cooksons 999AFF.
Once you have the first tight circle, you can also insert the tip of a square or three sided needle file (or possibly a very large nail, filed to similar shape) to wind or unwind the coils.
As mentioned above the squeezing of the coils into becomes difficult even after annealing, so I think fine silver wire, being softer, would improve matters.
Dennis.
-
I have planned to get me one of those drills, will probably try to find one on Amazon when shopping for Christmas gifts, I can't seem to find them in Sweden.
Aha, so that is how you use the file to wind the coils, I thought it looked easy but couldn't quite figure out how it was done.
I guess it all comes with practice as well.
/Andreas
Tags for this Thread
 Posting Permissions
- You may not post new threads
- You may not post replies
- You may not post attachments
- You may not edit your posts
-
Forum Rules


 Reply With Quote
Bookmarks