-
 Soldering, again
Ok I hope my questions aren't getting tiring, but I'm here with a few more! I have gone back to some of the posts here more than once to reread the advice and it is very helpful but I'm still unsure about some things.
If using solder paste, do you spread the back of the piece to be soldered as if buttering bread or just place blobs of it about? And when soldering small round silver balls, I try to file one side flat but if using strip solder, it's almost impossible to get the ball to sit on top of the pallions so I place it alongside the ball which seems to mostly work out ok. Is this the best way?
I've practiced heating silver to watch it melt and practiced soldering scrap pieces. I've learned I was heating my metal too rapidly in most cases. I still continue to have issues with solder paste though, seems it either crumbles into nothing or it's not heated enough and the solder breaks off during pickling. I'd like to get the hang of it though for soldering small detailed pieces together. Strangely my practice pieces using solder paste worked out great, though I used what felt like too much paste in order to watch how it worked better. Maybe I am not using enough paste on my real projects?
Current experimental piece I'm working on contains many small silver balls and wires soldered to a flat piece of silver. I used an easy strip solder on some bits and easy solder paste on other bits and soldered it all at the same time. The bits that were soldered with paste fell off in the pickle pot and the bits soldered with strip stayed on. It is getting pretty frustrating actually. Now I will need to resolder the bits that fell off and hope I don't ruin the previously soldered parts.
-
Sandra,
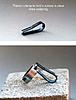
I would not advise that you used both solder and solder paste on the same job. Although they may be both labelled as easy, if you check the melting range temperatures the easy paste solder can melt at temperatures as low as 550C and the soldid easy solder melts at about 705C which is probably why the parts you used paste on came off. I would advise that you get used to solid solders, if you ave multiple solderings do some with hard and then some with easy. You will find that hard solder does not run much on second heatings. As for holding silver balls in place on top of pallions how about making yourself some small clamps to hold them in place while soldering. Like this one I made to demonstrate the many uses of soldering clamps. I never use solder paste because I like to see the amount of solder I am using on a job.
James
-
I will of course echo all that Jim has said.
I will add though, that you can melt tiny pallions onto the balls, heat up the metal and put the little balls on the metal. Hard solder works well for nearly all requirements, but over the years, I have come to love soldering and will now use easy in my work too. Must be a confidence thing if you are self taught and a apprentice thing if under tutelage.
I still tend to used clamps made from steel cotter pins, as they work for me, although I am more adept at sawing when my neck allows me to and may tackle some from flat sheet steel, pain free permitting!
of all the techniques, soldering is one of the hardest to learn, but using pallions rather than paste will change how you do what you do and make it easier to learn. It is also infinitely cheaper in the long run too. Seeing the solder run when you hit the orange glow is very satisfying.
-
PRactice makes perfect - I love m'soldering too now.
I'm another hard user by choice, I use the easy paste for ear pins or soldering small jump rings or chain links.
I love my borax though, and can't get along with auflux.
Like others have said, I've found practice at heating the metal and getting a feel for warming the whole piece up before rocking across any join is the key. Good luck and stick with it!
-
For soldering balls, I would prefer to make a little cup in the sheet, with a round burr for the ball to rest in and add a tiny nib cut from strip solder, tucked into the crevice on one side, as you have mentioned.
Now the secret is to apply heat gradually from the opposite side, because solder will melt and run towards the heat.
As for adding a flat piece to the top of another flat piece, that is best done by sweat soldering. Turn the top piece over, clean, flux and distribute pallions (little pieces of of strip solder) evenly over it. Then heat until the solder only just melts.
Let it cool (no need to pickle). Turn it the right way up onto the clean fluxed piece you will fix it onto, and re-heat. when you see a line of solder shimmering all round the edges, you are done. I should mention that if the lower edges of the top piece are lightly bevelled first, the solder will be deterred from running out.
Dennis.
-
Hello Sandra,
I'm a newcomer to the forum and relatively new to the craft so I don't feel I'm qualified to give advice as such.
I can say however that one thing that has helped me with my soldering particularly with small joints, was to purchase a couple of very fine artists brushes for putting the flux exactly where I want it. Its probably no substitute for a properly prepared and heated joint but my success rate has improved, seemingly with less solder travelling in the wrong directions!
Sizes 2/0 and 4/0 are what I use for both borax and auflux.
If you get nylon bristles (such as Polar white) and keep them clean they are also excellent for fine detail oxidising with Platinol as the bristles don't rot
Hope this may be useful
Tim
-
Back with more soldering questions grrrr! I used hard silver solder strip for the first time today and soldered a joint (for a rim to go around a pendant) and worked great. I have spent the last few hours trying to solder my rim to a piece of silver sheet using hard silver solder again. I outlined my pendant with a marker on the silver sheet after filing the surface nice and smooth, painted borax paste with a brush and carefully layed my bits of solder all around the edge of my drawn outline.
My solder will just not melt and I don't know why. I tried heat from the top and also from the bottom. My Proxxon torch is set at its highest setting. I am working in a room that's not really heated so it's a little cold. It wasn't bad earlier but I just had to call it a night as it was getting too cold. Could the cold cause my solder not to heat to temperature? Another factor I am curious about is the can of butane I refilled with today, it's just a can from the pound shop. Swan brand I think. Is there a difference between butanes? Ugh I am so frustrated.
By the way, my husband asked what I wanted for Christmas, I answered jewellery making lessons!
Last edited by Sandra; 28-11-2013 at 07:16 PM.
-
A quick tip on soldering silver - all the metal needs to have a soft orange glow all at the same time to encourage the solder to flow. It may take a while to get there, and the bigger the item, the longer it will of course take. You want to take it past a cherry red, as this is not yet too hot and will not encourage the solder to stay balled up. Having said that, at cherry red and with your soldering pick you can push the solder to the metal and it should just do an instant melt when you hit orange. It is not advisable though as this is close to the point of the silver melting itself. Keeping the flame moving around the whole piece with silver is important to ensure the metal gets to the right temp. You can heat it onto a dark red in silver, but at this point be very careful as it is near it's own melting point. With gold, you can concentrate on the area that needs to be soldered.
Have you thought about making a little house from some soldering bricks? They retain the heat and will help with getting the temp needed for your piece. Your torch can get a helping hand by retaining the heat in other ways. Another alternative is the 'soldering wig' lots of coiled binding wire on a metal plate that has a long handle. This works well on the piece, but you need to wear eye protection as the glare from the binding wire is not healthy for your eyes. I wear tinted goggles all the time, when soldering, as eye health is important too. The Torch you use will have an impact on the heat you can get to, and that will need to be considered. A bigger load of metal will need a bigger load of flame. I started off with one of the DIY go-gas torches and would pull the flame away on bigger items and a pencil torch for wire work. However, this is something I wanted to do and invested in a better set up.
If the cost of a soldering wig is too much. You can make your own version with thick binding wire. It has to be thick - not the thin spindly stuff. Coil most of the binding wire around a big biro and then pull it out slightly stretch it back and scrunch it up into a ball, and then flatten it. The heat generated from the wigs is good. They do not, however, provide much of a solid surface and practice before using your final piece is always recommended for you to work out the best way to get results.
edit: here is a link to a soldering wig via our forum hosts, Cookson Gold: http://www.cooksongold.com/Jewellery...prcode-999-963
The fuel you use shouldn't be too much of a problem.
Another thing you can do, if you reach the required orange, is to quickly swipe a thicker coating of borax on the area. I have seen and then used the cone directly on a couple of occasions, but you have to be fast. You need the benefit of the glaze from the borax or equivalent to help the solder have something to stick to so it can melt and adhere. But you already probably know that.
Pop it all into your pickle solution, rinse it off and get it to glow. If you don't have bricks, you can always use soldering boards or soldering fibre.
kindest,
Wallace
Last edited by Wallace; 28-11-2013 at 09:42 PM.
Reason: added hyperlink to soldering wig
-
I'm very inexperienced in jewellery making, but you mentioned the torch - yes the temperature in the room can affect the burning temperature if yours isn't a pressure regulated torch. (something to do with the gas pressure in the can being lower at lower temps....).
I use a basic plumbers torch and when my utitily room is very cold I can't get anything but the smallest item hot enough to solder - when normally I don't have any problem at all with the same torch. Brought everything into my kitchen and gave the torch half an hour to warm up and hey presto, worked no problem.
-
That's an interesting thought. Fridges don't work well in very cold rooms either, but then you could just leave the fridge door open.
 Posting Permissions
- You may not post new threads
- You may not post replies
- You may not post attachments
- You may not edit your posts
-
Forum Rules


 Reply With Quote

Bookmarks