Page 2 of 4 FirstFirst 1234 LastLast
Results 11 to 20 of 35

Thread: 1 Year to perfect it, but where to start

  1. #11
    Join Date
    Sep 2012
    Posts
    67

    Default

    Apartently the little dove has changed her mind about design. although i am still interested in making one like the above. i will not be beaten

    Wax casting was my original thought, and the stone would be flush with the surface. i am glad you pros think this too.

    Copper, never thought of using that for mock ups!

    I will update you on my progress with this, and what design my friend comes up with...tut...copper...why didnt i think of that lol

  2. #12
    Join Date
    Sep 2012
    Posts
    67

    Default

    So the design is a simple single band, with 5 stones, flush with the surface, once i get the proto up and running ill post a picture.

    Going to contact some diamond suppliers and get some prices

    Just got to work out how to set the stone without damaging the gold, when setting in silver i end up with sratch marks where i am pinching the top over the stone....practice

  3. #13
    Join Date
    Sep 2012
    Posts
    67

    Default

    Click image for larger version. 

Name:	83B78%20White.jpg 
Views:	34 
Size:	10.4 KB 
ID:	4239

    this is what we are going for

  4. #14
    Join Date
    Jul 2009
    Location
    Romsey
    Posts
    5,258

    Default

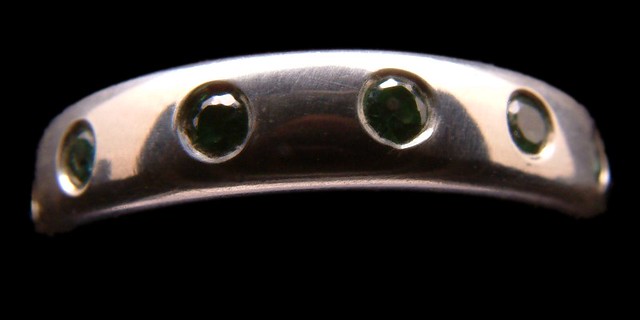
    One of my early flush-setting experiments -


    I'd strongly recommend the Blaine Lewis DVD on flush setting - yes, I know it's expensive, but it is very, very good (as I've enthused before).

  5. #15
    Join Date
    Dec 2009
    Location
    Central London
    Posts
    8,851

    Default

    Well that at least avoids the necessity for casting. Its easy enough to make yourself, or even to buy one ready made. You will note from my earlier post and Peter's example that the stones need to be well protected by metal on each side.

    You will also need to practice if you have not done so already, to mark out accurately using dividers, the positions for the pilot holes of your settings.

    The starting pits can then be made with a tiny ball burr, rather than a punch.

    The holes are best drilled using a mini-pillar drill, such as the smallest Proxxon, or a vertical stand for your present handpiece.

    The ring needs to be fixed vertically and moved for each hole in a mini drill vice. The jaws of the vice are made safe with masking tape. Dennis.
    Last edited by Dennis; 22-01-2013 at 02:56 PM.

  6. #16
    Join Date
    Sep 2012
    Posts
    67

    Default

    Quote Originally Posted by ps_bond View Post
    One of my early flush-setting experiments -


    I'd strongly recommend the Blaine Lewis DVD on flush setting - yes, I know it's expensive, but it is very, very good (as I've enthused before).
    that is beautiful.

    Ah yes it is expensive...mind you i guess if i want to do it right, i need to do it properly.

  7. #17
    Join Date
    Jul 2009
    Location
    Romsey
    Posts
    5,258

    Default

    A plain oval wire band ring with some holes in it, really. I *think* that was after I got my Foredom - trying to cut stone sets with a Dremel is not good for the nerves (or safety) - it spins far too fast and the lack of foot control makes it all a bit iffy. The main tools used for the setting work were a 1mm drill bit, bud burrs, setting burrs and a needle burnisher. Oh, and a suitable ring clamp.

  8. #18
    Join Date
    Jan 2012
    Location
    dear old Blighty - (in deepest Wiltshire)
    Posts
    1,638

    Default

    Quote Originally Posted by ps_bond View Post
    One of my early flush-setting experiments -


    I'd strongly recommend the Blaine Lewis DVD on flush setting - yes, I know it's expensive, but it is very, very good (as I've enthused before).

    A most excellent DVD

    you may find it useful to have a look at some of Alan Revere's tips too.. I would offer the JCK website, but it loads adds all the time!

    Attachment 4240 this is a ring I made for my lad for his year 11 'prom' With a little help from watching the video.

    It isn't on D Wire, but it was great fun to make.

  9. #19
    Join Date
    Sep 2012
    Posts
    67

    Default

    Well i think i am getting their, i have the stones and material, and am working on my mock ring

    At the moment i am managing about a 20% success rate, but have contacted someone for a price to set the stones if it gets too close and i havent achieve 95-100%

    Although in theory i am doing it right, (mind you if i was doing it right i would have success lol) when i come to actually making the seat for the stone, my burr doesnt actually seem to be doing anything (strange as its new) but none the less i have a theory about this...not lubricating it aparently.....im sure ill get there...

    Unfortunately i have no pictures for the time being...my mock ring consists of only holes, toying with the idea of just hammering it flat once done (still ring shape) might look good...might not

    OOoooo trial and error

  10. #20
    Join Date
    Dec 2009
    Location
    Central London
    Posts
    8,851

    Default

    You're right. Lubricate with a little 3-IN-ONE oil and once drilled, you can turn the burrs by hand in a pin vice, (also called universal handle Cookson 999AZM) for the best accuracy and for conserving burrs.

    If funds allow, get two, to save changing burrs, but if you are making tiny undercuts, you will still need a scorper, or a handpiece for the tiny burr. http://www.cooksongold.com/category_...?query=999+AZM
    Dennis.
    Last edited by Dennis; 03-06-2013 at 05:21 PM.

Bookmarks

Posting Permissions

  • You may not post new threads
  • You may not post replies
  • You may not post attachments
  • You may not edit your posts
  •