-
 How on earth?
Hello
I hope you are all keeping safe...and sane!
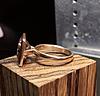
I wonder if any of you can give some advice on this please. Ive seen this ring, made by William White, and I really want to work out how to create this setting but I just cant!!
Does anyone knowing how on earth its done please?
Thanks so much
Emmy


-
I think its probs cad and cast the stone will be scanned so the setting can be made as fine as possible but I could be wrong.
-
Maybe the photos don't reveal all, it is just a fairly standard bezel set ring nothing remarkable, make the components, solder together and set stone, or make wax model then cast etc.
-
I’ve never made a backless bezel for a faceted stone before. Do you just do as you would for a cab? Ie create a square the same size as the stone, fix it to a plate, then saw the hole out? Will the faceted stone sit evenly in it?
Thank you x
-
For the bezel, start with the stone upside down, on a piece of silver sheet about 1.3-1.5mm thick.
Keeping the stone steady, if necessary with the aid of a tiny scrap of BluTack and of course your finger, scribe the square using a craft knife, rather than a scriber.
Once you have the square marked out, use a ruler to mark an inner square, just over 1.0mm smaller all round, and cut it out.
You now have the bearer marked out, for the stone to sit on, but it needs to be lowered using burrs, or scorpers, until the girdle of the stone sits about 0.5mm below the metal sheet. This is the tricky bit, and needs to be done slowly and carefully. It could take 30-40minutes.
Once the stone is sitting correctly, you can mark the outer rim evenly using dividers, and add the supports and shank finish the metal, file the outside bevel, and inset the stone.
Note that gem stones are not perfectly square, so mark one corner of the stone and the setting, so as to always insert it the same way. Practice with copper first. Good luck. Dennis.
-
A good walk through from Dennis.
Instead of using BluTack you could try double sided tape or cellotape on the stone and super glue the cellotape to the metal. I saw this done recently on Instagram:
https://www.instagram.com/p/B-vVnnil...=1tpg66y17aqgr
It's the second and third pictures in the sequence.
In addition to casting mentioned by Bob you could machine the top plate using a computer aided mill.
 Posting Permissions
- You may not post new threads
- You may not post replies
- You may not post attachments
- You may not edit your posts
-
Forum Rules


 Reply With Quote

Bookmarks