Interested in learning how to set a stone in a 4-claw ring? Whether you’re planning on setting your own engagement ring or are keen to expand your jewellery making expertise, use our video tutorial and our guide as a reference for learning some basic stone setting techniques. In this guide we’ll talk you through the tools needed for stone setting, and the fundamental steps of setting a stone in a 4-claw ring.
Watch our video tutorial below on how to set a stone in a 4-claw ring. With a visual reference, you’ll learn how to use the different types of tools needed for stone setting, and our expert tips on setting a CZ stone into a 4-claw ring.
[iframe width=”560″ height=”315″ src=”https://www.youtube.com/embed/nl4QkYXixZo” ]
Tools needed for stone setting
When learning how to set a stone in a 4-claw ring, there are a few essential setting tools you’ll need before you get going. The tools needed for stone setting include:
- A pendant motor
- A small ball drill or a stone setting burr
- Ring clamps
- A flat end pusher
- A grain tool
- A chain nose plier
How to set a stone in a 4-claw ring
As stated in the video, every jewellery maker’s stone setting techniques are different. However, as long as the basics are there, the end result should be the same.
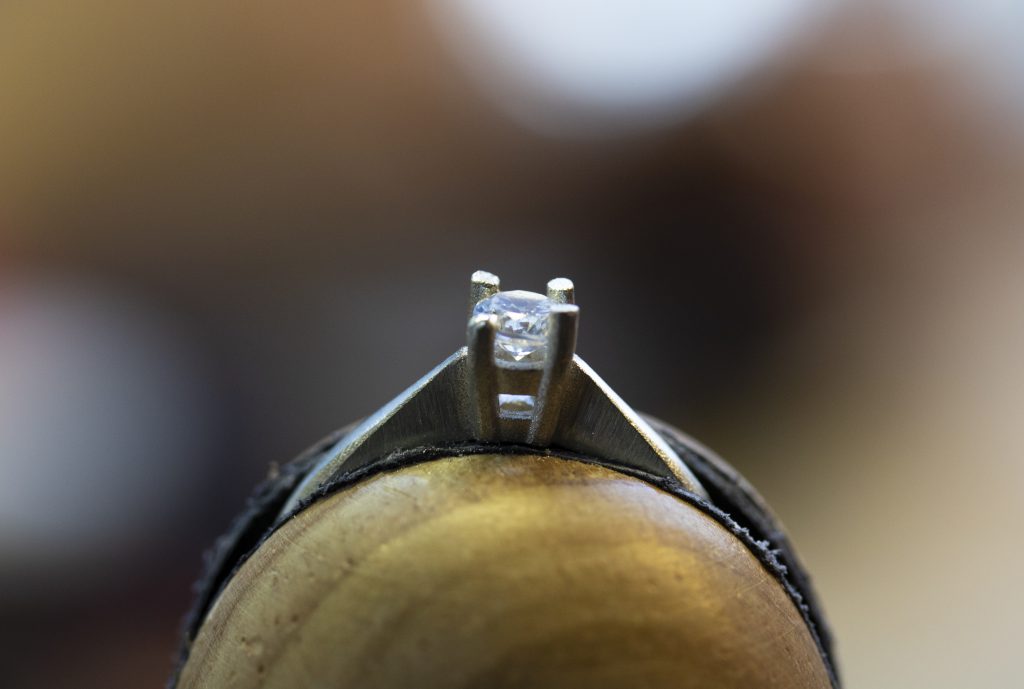
Follow our steps and you’ll have set your very own ring:
- First, make sure that your ring is straight in the clamp. We’d also recommend that you use a semi-circle shaped groove as this will support the clamp better than any other shape.
- Next, you’ll need to check the stone against your ring. To ensure it’s the right size the stone needs to sit on the top, not covering the claws. Also, the stone needs to be slightly bigger than the gap in the ring at this stage. Place the stone straight in the gap, and then gently press it in using a pusher or even your fingertips.
- Then use a small burr larger than the girdle of the stone to drill just below where the stone will sit. Prior to this, dip the burr into lubricant to prevent it from heating up too much while drilling, and then, with the burr, create a small groove along the claw.
- Once drilled, place the stone in the gap. It should fall into place with ease, if not, add a little pressure and it should click into the gap.
- Happy with the positioning? Grab your pliers and squeeze the opposite sides of the claw so that it stays even. Doing this from the top, close the claws a small amount at a time – use your thumb to guide you.
- Make sure there’s some metal over the top of the stone, as this will hold the stone in place. Then check that it’s even.
- Once you’re pleased with the positioning, it’s time to file. Use your needle file (preferably a cut 4 file for a smooth finish) and file the claw down but ensure it’s above the girdle.
- Now, round them off with the file. Just try not to file the stone as it could create scratches!
- Finally, use your grain tool – we recommend using a size 20. Place it over the rounded edge of the claw, add some pressure and then wiggle the file. Then repeat for each of the 4 claw edges. Now you have finished setting the stone into your ring!
Our top tips on how to set a stone in a ring
Now you know the basic stone setting process, we’ll share some of our top tips with you on how to set a stone in a ring. One of our main tips is to use CZ (Cubic Zirconia) stones as your primary stone for setting practice. CZ stones are hardwearing, easily accessible and cheaper to use. Also, you can stock up on CZ stones in packs of 20, 30 and 50 at Cooksongold. Another one of our top tips is to use a small ball drill rather than a stone setting drill, as it is slightly less secure than a ball drill because it creates a groove for the stone to sit in.
Now you’ve read our guide on how to set a stone in a 4-claw ring and watched our video tutorial, we hope you’re feeling confident to give it go on your own. For your next stone setting project, why not follow our step by step guides and try your hand at making your own prong setting or even a bezel setting?
Learn more about all the different types of jewellery making projects by reading through our beginner guides on The Bench. For all your jewellery making tools, browse through full range of jewellery tools online today.

Cooksongold